Tag Manager is a free tool that makes it easy for marketers to add and update website tags — including conversion tracking, site analytics, remarketing, and more — with just a few clicks, and without needing to edit your website code.
Use Tag Manager to manage tags (such as measurement and marketing optimization JavaScript tags) on your site. This reduces errors and frees you from having to involve a developer when configuring tags.
The Chrome Extension For Google Tag Manager allows you to edit tags within the context of the web page you are previewing them on.
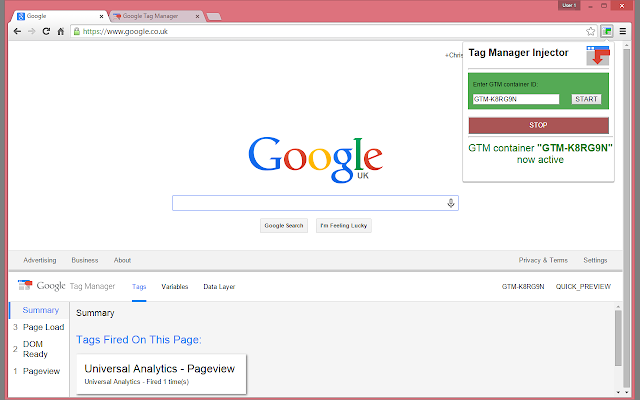
Chrome Extension For Google Tag Manager
A lot of new things have happened in the industry since the first time when I published this blog post (back in early 2017). Almost three years have passed and a lot of new tools were developed (or discovered). The time has come for the 5th version of this list.
If you’re using Google Tag Manager as often as I do, you’re probably looking for new ways to improve your performance, catch bugs faster and deliver the final result without much hassle. If my guess was right, you’ll enjoy these 22 Google Tag Manager extensions and tools (and not all of them are just for Google Chrome). And the best part – they’re all free! So do not hesitate and give them a shot.
Google Tag Manager Ebook Bundle
All Google Tag Manager Extensions are displayed in no particular order.
Tag Assistant (Legacy) + Tag Assistant Companion
Data Slayer
Data Layer Sifter
WASP
Da Vinci Tools
GTM Sonar
dataLayer Inspector+
GTM Variable Builder
Data Layer Checker
Copy CSS Selector
GTM Tools
GTM Copy Paste
customTask Builder
GTM Debug
SandoGTM
GTM Spy
GA Debugger
EditThisCookie
Redirect Path
Facebook Pixel Helper
Twitter Pixel Helper
UET Tag Helper
1. Tag Assistant (legacy) + Tag Assistant Companion
The Tag Assistant Chrome extension is a very useful tool in testing and debugging your implementation. Not only does it help with troubleshooting of Google Tag Manager, but also Google Ads, Analytics, DoubleClick, and other tools can be easily verified.
One of the most powerful features within the extension is recordings. This allows you to “record” a browsing session and produce a report on all of the hits being sent through and even how they will potentially show up within Google Analytics. By the way, you can find my guide on this extension here.
Get Tag Assistant for Chrome
However, as you have already noticed, the name of the extension contains the word “Legacy”. Eventually, this extension will be deprecated. So if that happens, then you can use a lighter version of the extension, and it is called Tag Assistant Companion. Even though it does not have Legacy’s debugging features, it will still enhance your GTM’s preview and debug mode.
120+ GTM resources
Subscribe to newsletter and get a powerful list of Google Tag Manager tools, articles, etc. From A to Z
Your email address
Your first name
SUBSCRIBE AND GET THE LIST
Unsubscribe at any time.
2. Data Slayer
Another entry in this list of Google Tag Manager Extensions, Dataslayer, adds a panel to Chrome Developer Tools that monitor tag management data layers and displays changes in an easy-to-read, user-friendly format.
Not only does it support Google Tag Manager, but it also plays well with Tealium.
Get Data Slayer for Chrome
3. Data Layer Sifter
This Google Tag Manager extension helps you find DOM elements and their values within the Data Layer fast. GTM dataLayer Sifter can be used to search a particular event in the Data Layer for a DOM element to be used in Google Tag Manager.
If this is still difficult to comprehend, here is a sample use case of what you can achieve with DL Sifter:
If you wish to track Form Field values, you need to define the element’s “path” on the website. This might be really time-consuming, but with the help of Data Layer Sifter, this can be achieved much easier.
You can learn more about Data Layer Sifter in this video tutorial.
Get Data Layer Sifter for Chrome
4. Web Analytics Solution Profiler – WASP
Update: It looks like this plugin is no longer available as it returns a 404 error in the Chrome Store. However, I’ll still keep this here for a while (because maybe that’s a temporary issue).
This extension is for advanced users. WASP gives you a visual representation of the tags firing on your site and the correlation between them.
Clicking any of the tags provides deep technical insight into what’s happening behind the curtain. WASP’s functionality allows you to peer into the Google Tag Manager data layer which eases the troubleshooting of Google Tag Manager and Universal Analytics implementations.
WASP also supports Omniture, SiteCatalyst, DoubleClick, and any other platforms you may be implementing.
Get WASP for Chrome
Google Tag Manager Ebook Bundle
5. Da Vinci Tools
Da Vinci Tools brings handy enhancements, bug fixes and hacks directly into the Google Analytics and Google Tag Manager interfaces. To name a few:
Focus on the same report when switching view in Google Analytics
Set default page in GTM interface (instead of Overview)
Ability to turn all GTM built-in vars on/off at once
Ability to copy values from GTM Preview and Debug Mode’s Data Layer Tab and many many other enhancements.
And I’m just scratching the surface here! Many more enhancements are waiting for you.
Get Da Vinci Tools for Chrome
6. GTM Sonar
Created by Simo Ahava, this extension lets you debug clicks and form submissions easier. When enabled, it prevents links from redirecting you to another page and form submissions from refreshing/redirecting you to another page.
Why prevent the default action of click or form submission? Simple, for debugging reasons it’s better if you stay on the same page. Halting the default action prevents links from working, thus you can easily check what happens on a website and what data can be used for tracking purposes.
Get GTM Sonar for Chrome
7. dataLayer Inspector+
This is one of my new favorites. What I like about it, is that the extension (by Adswerve) can inject your GTM container on a site, logs what data was pushed to dataLayer, runs diagnostics for most common issues, and offers a bunch of other features. I’m also giving a closer look at this extension in my Intermediate GTM course.
Get dataLayer Inspector+ for Chrome
8. GTM Variable Builder
This useful plugin enables you to easily create Custom JavaScript variables that retrieve values of particular website elements. If you’re not familiar with the DOM variable, feel free to use this extension.
How does it work? Open JavaScript console in Chrome, highlight any element on a website and click extension’s icon. What you’ll get is the JavaScript function that should be used in a GTM Custom JavaScript variable.
Get this extension
9. Data Layer Checker
Another extension to help you easier debug what’s happening in the Data Layer. But unlike Data Slayer or Data Layer Inspector, this plugin enables you to check the Data Layer without having to use the browser console.
Which one is better, you ask? Well, it’s up to you. Try all 3 and see which one fits your needs the best. My personal favorite is Data Layer Inspector because it also offers a bunch of other features, like injecting GTM container.
But if you don’t need the Swiss army knife and just want to debug the Data Layer, maybe Data Layer Checker could be your choice.
Get this extension
We’re halfway through. 10 Google Tag Manager Extensions down, 10 to go! There are some gems waiting for you so don’t go away and continue reading.
10. Copy CSS Selector
If you’re regularly working with Matches CSS Selector operator in Google Tag Manager, then this extension is for you. Why is it useful? If you struggle with CSS Selectors or just want to save time, Copy CSS Selector will do the work for you. Just right-click the website element you wish to track, hit Copy CSS Selector, and paste the selector in your Google Tag Manager Trigger.
If you don’t know what CSS Selectors are, read this Simo Ahava’s guide. They are especially useful (but not limited to) when you want to track clicks of a particular website element that has no ID and shares the same CSS Class as several other elements.
Learning some basics of CSS Selectors opened new possibilities for me, so you should definitely dig in too.
Get this extension
11. GTM Tools
Another very useful tool created by Simo Ahava. This time, it’s not a Google Tag Manager Chrome extension but a hosted web-tool that helps me audit and manage/clone GTM container. It has 3 main features:
Container visualization (with it, you can find which container elements are heavily used or are not used at all).
Inspect container
Clone container. I’ve used this feature to export a part of a GTM container (because, by default, GTM exports the entire container). However, there’s a new player in the town, a Google Tag Manager Extension (for Chrome) that can help you do that even faster. Continue reading and I’ll show you what I mean.
Start using GTMTools
12. GTM Copy Paste
Julian from MeasureSchool published an amazing time-saving Google Tag Manager Chrome Extension. With it, you can easily copy GTM container elements (tags/triggers/variables) and paste them to another container with a single click.
Take a look at these two videos to learn more:
The main introductory video
Updated extension features
Get this extension
13. customTask Builder
The 3rd tool on this list developed by Simo Avaha. If you’re not familiar with a Custom Task yet, read Simo’s guide first. In a nutshell, customTask is a method of the Universal Analytics library, which lets you run JavaScript code when the hit request to Google Analytics is being built.
There is a whole bunch of possible ways of how customTask can be applied. To name a few: remove Personally Identifiable Information from GA hits, automatically reduce the GA payload size, and many more. Since this feature is an advanced one, Simo Ahava prepared a customTask builder tool that will simplify the process.
Check it out
14. GTM Debug
An amazing Chrome extension developed by David Vallejo that eases the process of Google Tag Manager debugging. Among many useful features, here are the most noteworthy (in my opinion):
Copy Data Layer pushes in a formatted way
Ability to view Data Layer pushes of previous pages
Filtering by GA Hit Type or GA account ID
Simplified Enhanced Ecommerce debugging (I’ve used this GTM extension in the Enhanced Ecommerce module of my Intermediate GTM Course. A real time-saver).
These and other useful features are waiting for you in that GTM extension so definitely try it out.
Get this extension
15. SandoGTM
Recently, I stumbled upon this Google Tag Manager Chrome extension and probably haven’t uncovered its full potential yet. However, it looks really useful and offers some handy tweaks that Google Tag Manager’s UI is lacking. The most important to me: bulk delete feature. Just tick checkboxes next to tags and then hit the Delete Button.
Get this Google Tag Manager extension
16. GTM Spy
This free tool (no signup required) lets you check what’s inside of the GTM container of any website. This can help you with spying on the competitor or just recreate the content of the container that you lost access to. I’ve heard multiple times of situations where rogue agencies lock the client away from the container (even though that container is definitely the client’s property).
In such cases, you could just use GTM spy and export the container that is used on your own website. Then create a new GTM container and import the file that you exported via GTM Spy. Finally, ask your developers to change the container ID in your website’s source code. That way, you’ll solve this nasty issue with the agency.
Keep in mind that GTM spy has some UI/UX issues but as long as it is working (and free), I believe we can live with that.
Get started with GTM Spy
The next 6 extensions are useful even if you’re not using Google Tag Manager. But since I am implementing (almost) everything with GTM, these tools always come in handy.
17. Google Analytics Debugger
This extension lets you see what data is being passed to Google Analytics. For me, this was extremely useful while debugging Ecommerce implementation (until the GTM Debug extension was created by David Vallejo).
It prints useful information to the Javascript console of your Chrome browser. These messages include error messages and warnings which can tell you when your analytics tracking code is set up incorrectly. In addition, it provides a detailed breakdown of each tracking beacon sent to Google Analytics.
Get Google Analytics Debugger for Chrome
18. Edit this Cookie
With it, you can view cookies set by Google Analytics, delete, modify, and even add additional cookies. This is a great tool for verifying GA trackers and any other custom cookies that may be in use.
Although you can also achieve the same result with the built-in tools of your web browser, Edit this Cookie makes the process much easier and user-friendly.
For me, this is a must-have tool when I set and read cookies with Google Tag Manager. Even though you can achieve pretty much the same result by using the browser’s built-in functionality, this extension makes the work easier.
Get Edit This Cookie for Chrome
19. Redirect Path
This extension allows you to easily see all the redirects that happened between two pages. One of the most popular use cases for me: Debugging of Cross-domain tracking. One of the main requirements for GA cross-domain tracking to work is to have the destination URL decorated with the linker parameter (_ga=……).
But what if you’re configuring the cross-domain setup but the target URL never gets decorated? Two possible reasons are:
The link was never decorated on the initial page
Between two pages, there were multiple redirects and during one of them, the linker parameter (_ga=…) was lost
Redirect Path extension can help you identify such an issue. Just install it, navigate from page A to page B (while debugging your cross-domain setup) and then click the extension’s icon in the top right corner of your Chrome.
In the example above, there was one redirect. The kwikipedia.org URL contained the linker parameter but after the redirect (type 302) the parameter was lost. If that’s your case, contact the developer of the site and discuss how can they fix this (because it’s impossible to fix this with GTM).
Get this extension for Chrome
20. Facebook Pixel Helper
The Facebook Pixel Helper is a troubleshooting tool that helps you validate your Facebook Conversion Pixel and Custom Audience Pixels. Using the tool you can verify whether the pixel is working properly, what events were fired, and spot errors in no time.
A small number will appear on the Facebook Pixel Helper icon to indicate the number of pixel events. When clicked, a panel will expand to show a detailed overview of the page’s pixels, including warnings, errors, and successes.
Either you’re installing Facebook pixel or tracking FB conversions with Google Tag Manager, Facebook Pixel helper is a no-brainer and reliable debugging companion.
Get Facebook Pixel Helper for Chrome
21. Twitter Pixel Helper
Similarly to Facebook Pixel Helper, Twitter Pixel Helper does the same job, but for Twitter Universal Website tag.
You can check whether the Twitter Tracking code (Pixel) was implemented successfully. Troubleshooting of Twitter events (conversions) is also available.
Get Twitter Pixel Helper for Chrome
22. UET Tag Helper
The third Pixel Helper in the gang. This one helps with debugging and validating Bing’s UET (Universal Event Tracking) tags. Here a quick intro video about this extension (but more or less it works in the principle as helpers of other tracking pixels).
Google Tag Manager Extensions: Final Words
All great things must come to an end, even this list. I hope you found the collection of Google Tag Manager Extensions and tools useful. Spotted something new? Give it a try! Maybe you’ll love it. Now, I just cannot live (well, work) without some of them. My everyday go-to tools at the moment are:
Tag Assistant
Data Layer Inspector
Redirect Path
GTM/GA Debug
Da Vinci is working in the background
GA Debugger
best use of google tag manager
Google Tag Manager is a free service that allows easy injection of tags on websites. In simple words, Tag Manager helps you fire JavaScript code, such as Google Analytics tracking code on your website or specific sections of your website.
I started using Google Tag Manager a year ago and since then became probably it’s biggest fan on Earth, as it allows enhancing your analytics setup and provides an easy way to introduce changes to your website.
Tag Manager allows you to do so many things, and this article is an attempt to help you get started with a few. To fully benefit from the article you need to grasp a few concept behing Google Tag Manager:
Tag Container: a collection of tags that are defined in Google Taga Manager and are fired on your website
Tag: a single script that is fired based on a rule (i.e. fire AdWords Conversion Tag when a visitor registers on the website)
Rule: a URL-based or event-based rule that causes the tag to fire (i.e. user submits registration form)
Macro: a variable, either predefined or collected from an element or code on the website, that can be used in defining the rules (i.e. page URL or HTML form id)
Let’s get started:
- Add all tracking scripts you need without the help from engineers
The most obvious benefit of using Google Tag Manager is the ability to publish all tracking scripts without involving your engineers (just make sure you don’t break the website).
If you have Google Tag Manager installed on your website you can easily adjust and publish Google Analytics, Piwik, Kissmetrics, Optimizely, Hubspot or whatever other tracking scripts you use.
Tag Manager has a predefined tag for inserting Google Analytics or Universal Analytics tracking codes, but you can always use Custom HTML tag to add tracking codes for other tools:
When setting up Google Analytics or similar tracking scripts make sure you add “All pages” to the Firing Rules for the script to run on all pages of your website.
- Set up Google Analytics goal tracking
It is super easy to set up event-based Google Analytics goals. Using Tag Manager you fire a Google Analytics event when a certain event is happening (i.e. a visitor reached Registration Page) and then use this event to set up event-based goal in Google Analytics.
Start by creating a Google Analytics Tag in Tag Manager:
Insert the Tracking ID (Google Analytics profile ID, UA-XXXXXX), chose Tracking Type “Event” and fill in the Category, Action and Label names for the event you want to track:
In this example, Tag Manager will fire a Google Analytics event with the Category “user-flow” and Action “registration-page-visit”.
The only thing left, is to define the Firing Rules for this event to fire when a user visits “Registration Page” (assuming the URL of the “Registration Page” is something like www.greatwebsite.com/register):
Save and publish Google Tag Manager container, and let’s set up the event-based goal in Google Analytics by chosing “Goals” under the view section:
Chose “Custom” at the first step of goal set up:
Type in the goal name and chose type “Event”:
Type in the Category and Action names that you used when setting up the Tag Manager event:
That’s it! Every time someone visits the “Registration Page”, Tag Manager will fire a Google Analytics event and Google Analytics will register goal conversion based on this event.
- Fire AdWords Conversion Tag to measure conversions from SEM campaigns
If you use AdWords in your marketing mix, then you might be interested in tracking conversions this channel generates. Setting up AdWords Conversion Tag is extremely easy and come with a predefined tag:
Add Conversion ID and Conversion Label for the AdWords conversion that you want to track (you can find both under Tools -> Conversions). You can also add Conversion Value, but it is optional:
Finally, define the Firing Rule for the AdWords Conversion Tag to fire:
The above example assumed that after a user registers on the website, he or she is redirected to the URL www.greatwebsite.com/welcome; however, you can read further to learn how to set up a rule when there is no such “Welcome” page (hint: fire the tag on user registration form submission).
- Fire AdWords Remarketing Tag to collect remarketing lists
You can also use a predefined tag to fire AdWords Remarketing Tag:
To complete the setup you need to find the Conversion ID (under your AdWords account navigate to Campaigns -> Shared Library -> Audience and find the conversion id for All visitors tag).
Define Firing Rules as “All pages” for the remarketing tag to collect the list of all visitors to your website. Save and publish.
- Style your website with CSS
Sometimes you need to style or hide a particular element on your website (i.e. the regulator issued a new rule regulating the minimum font size of the financial warning). If your CMS allows it’s great, but there might be cases where you urgently need to do it and the engineers are not available or you just can’t wait for the next release cycle.
In this case, Google Tag manager offers a Custom HTML tag:
Just wrap your CSS with and set up the correct Firing Rules. Please also try to implement the change using a more permanent option; style your website with Tag Manager is great, but it has it’s limitations.
- Style your website with JavaScript
What if CSS alone is not enough and you need to add extra text of elements to the webpage (and the engineers are still not available)? That’s easy with the same Custom HTML tag and some knowledge of JavaScript or JQuery.
Add a new Custom HTML tag, write your JavaScript code (don’t forget to wrap it with and set up the Firing Rules.
Use .append(), .before() and .after() for adding block of HTML. For instance, if you need to add a warning before your website’s footer you could use the following:
Using a combination of CSS and JQuery you have very few limits of the ways you can adjust your website!
- Track button clicks
On particular occassions you might be interested in tracking button clicks on specific pages. For instance, you added a “Share on Twitter” button and would like to track the number of times people clicked on it.
In order to track the clicks of this button using Tag Manager we need to set up Google Analytics event firing (essentially, every time someone clicks “Share on Twitter” button, a Google Analytics event is fired). At first, create a Click Listener tag and fire it either on All Pages or on a specific page (use Firing Rules to control on which pages the clicks are tracked).
Now you need to add a Google Analytics tag (chose either Universal Analytics or Classic Google Analytics depending on which version of Google Analytics you are using) to fire an event that will be fired each time the “Share on Twitter” button is clicked.
Insert the Tracking ID of your Google Analytics profile, change the Track Type to “Event” and enter Category, Event and Action names for the event (use naming convension that suits your taste):
In the example above, every time “Share on Twitter” button is clicked an event with Category “button-clicks” and Action “share-on-twitter-button-click” will be fired.
Finally, you need to set up Firing Rules for this Google Analytics tag (we want it to be fired only when the “Share on Twitter” button is clicked):
In the example above the Firing Rule has two rules: 1) there is a gtm.click event is fired (this is fired by the Click Listener tag that we set up earlier), and 2) when the {{element id}} (or the id of the HTML element which was clicked) equals “shareontwitterbutton” (this assumes that “Share on Twitter” button has id=”shareontwitterbutton”, but you can adjust this value to reflect your website).
That’s it, now you can see clicks on the “Share on Twitter” button in Google Analytics:
- Track file downloads
In case you want to track file downloads off your website (i.e. downloads of the media kit from “About Us” page). Similarly to button click tracking you need to fire a Google Analytics event firing using Tag Manager.
Follow the steps from “Track Button Clicks” to create a “Link Click Listener” tag (make sure you chose “Link Click Listener” not “Click Listener” when setting up the tag).
Again, add a Google Analytics tag with Track type of “Event” and chose the names for Category, Action and Label (you can name as the way you prefer):
And set up the Firing Rules to track click on the Media Kit downloan URL:
As you can see from the above, the Google Analytics event will be fired when: 1) Link Click Listener captures a link click (gtm.linkClick event), and 2) the link URL includes media-kit.pdf (this assumes that you link to the Media Kit using Download Media Kit).
That’s it, every time someone click on the Media Kit download link a Google Analytics event fill be fired (another reason to check Real-Time section of your GA).
- Track form submissions
On some occassions, you want to track a specific action, such as user registration, but Google Analytics’ URL based goals are not an option (i.e. you don’t have a dedicated “Thank you for registration” page). In this case you can use Form Listener tag and create events when a specific form is submitted.
Similarly to button click and file download tracking you first create a listener. Chose Form Submit Listener this time:
Next, create a Google Analytics tag, choose Track type “Event” and fill in the Category, Action and Label of your choice:
Finally, set up the Firing Rules for the Google Analytics event to fire when User registration form is submitted (assuming this form has id “user-registration-form”):
Save, Publish Tag Manager container and check if this tag is fired correctly using Google Analytics Real-Time section.
- Track JavaScript errors
Finally, you might be interested in tracking JavaScript errors on your page (i.e. failing affiliates tracking script). Again, you will need to set up a listener tag and fire and event when this listener tag captures a Javascript error.
Conclusion
Let us know your thoughts in the comment section below.
Check out other publications to gain access to more digital resources if you are just starting out with Flux Resource.
Also contact us today to optimize your business(s)/Brand(s) for Search Engines