Creating a Google Chrome extension can sound like a daunting task, but it’s not as hard as it looks. Once you’ve got the basics down, you’ll be able to make all kinds of useful extensions for your own use or for others to enjoy.
In this blog post, we’ll cover the concepts and tools you need to know about to make your own Chrome extension. Let’s get started!
Table of Contents
How To Create Chrome Extension For Website
A chrome extension is a program that is installed in the Chrome browser that enhances the functionality of the browser. You can build one easily using web technologies like HTML, CSS, and JavaScript.
Creating a chrome extension is similar to creating a web application, but it requires a manifest.json file which we will discuss in the last section of this post.
What Will our Chrome Extension Look Like?
As you can see, the above chrome extension displays the latest data on Coronavirus (COVID-19) in the UK. We will be looking into how to create this extension in this blog post.
Here, we will be using the https://api.coronavirus.data.gov.uk/v1/data API in order to fetch data. We will only display the latest record for the simplicity of this post.
The complete source code of this project can be found on GitHub.
How to Create a Chrome Extension
First of all, we need to create an empty folder where we will add our HTML, CSS, and JavaScript files.
Inside the folder, let’s create an index.html file with this HTML boilerplate code:
<!DOCTYPE html>
<html>
<head>
    <title>Covid-19 Stats- UK</title>
    <meta charset="utf-8">
</head>
<body>
</body>
</html>
Now, let’s add a link to the Bootstrap CDN in the head tag. We will be using the Bootstrap framework here so that we don’t have to write some extra CSS in this example.
<head>
    <title>Covid-19 Stats- UK</title>
    <meta charset="utf-8">
    <link href="https://cdn.jsdelivr.net/npm/bootstrap@5.1.3/dist/css/bootstrap.min.css" rel="stylesheet">
</head>
In the demo, we saw that the records are displayed as a table. So now we need to work on creating a table.
<!DOCTYPE html>
<html>
<head>
    <title>Covid-19 Stats- UK</title>
    <meta charset="utf-8">
    <link href="https://cdn.jsdelivr.net/npm/bootstrap@5.1.3/dist/css/bootstrap.min.css" rel="stylesheet">
</head>
<body>
    <div class="container mt-3" style="width: 450px;">
        <h2 class="text-center">Covid Latest Report-UK</h2>
        <table class="table table-bordered">
            <thead>
            <tr>
                <th>Date</th>
                <th>Country</th>
                <th>Confirmed</th>
                <th>Deaths</th>
            </tr>
            </thead>
            <tbody>
            <tr>
                <td id="date"></td>
                <td id="areaName"></td>
                <td id="latestBy"></td>
                <td id="deathNew"></td>
            </tr>
            </tbody>
        </table>
    </div>
</body>
<script src="script.js"></script>
</html>
The code above creates a table with a width of 450px. There are four different headings in a table: Date, Country, Confirmed, and Deaths.
Here, you can see that each table data td has been assigned different IDs. We will be using the value of these IDs in JavaScript to update the table data. Also, here we have loaded the JavaScript in the end after loading all the HTML content.
Now, since the table has been displayed, we need to work on writing JavaScript in order to fetch data from the API.
Let’s create a script.js file and add the following code:
async function fetchData() {
    const res=await fetch ("https://api.coronavirus.data.gov.uk/v1/data");
    const record=await res.json();
    document.getElementById("date").innerHTML=record.data[0].date;
    document.getElementById("areaName").innerHTML=record.data[0].areaName;
    document.getElementById("latestBy").innerHTML=record.data[0].latestBy;
    document.getElementById("deathNew").innerHTML=record.data[0].deathNew;
}
fetchData();
Now, let’s break down the above code:
- Here we are using the async function called
fetchData. - The data is being fetched from the https://api.coronavirus.data.gov.uk/v1/data API.
- The JSON data is stored in a variable called
record. - The HTML content of td with ids
date,areaName,latestByanddeathNeware updated by the corresponding values of API.
If we check the browser, we will be able to see the following result.
The data is being fetched from the API and it keeps on updating as soon as the data in API changes.
Manifest.json File
As we discussed earlier, building a Chrome extension is similar to building any web application. The only difference is that the Chrome extension requires a manifest.json file where we keep all the configurations.
The manifest.json file contains all the necessary information required to build the Chrome extension. It is the first file the extension checks and everything is loaded from this single file.
Now, let’s create a manifest.json file in the root folder and add the following code:
{
    "name": "Covid-19 Stats UK",
    "version": "1.0.0",
    "description": "latest covid data of UK",
    "manifest_version": 3,
    "author": "Sampurna Chapagain",
    "action":{
        "default_popup": "index.html",
        "default_title": "Latest Covid Report"
    }
}
Manifest.json
Our manifest.json file contains the value of name, version, description, manifest_version (3 in this case, which is the latest manifest version), author, and action fields. In the action field, there’s the value for default_popup which contains the path to the HTML file which is index.html in this example.
You can have a look here to see all configurations of a manifest.json file.
Now, since we’ve also added the manifest.json file we are ready to add this project as an extension in our Chrome browser.
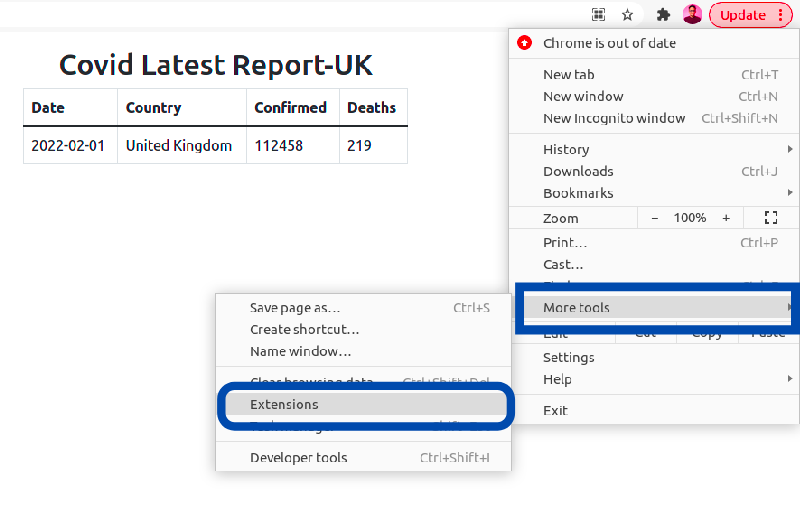
For that, we need to go to Select More Tools and then choose Extensions from the browser menu as shown in the picture below:
After choosing Extensions, it redirects to the extensions page in Chrome. Make sure to enable the Developer mode here.
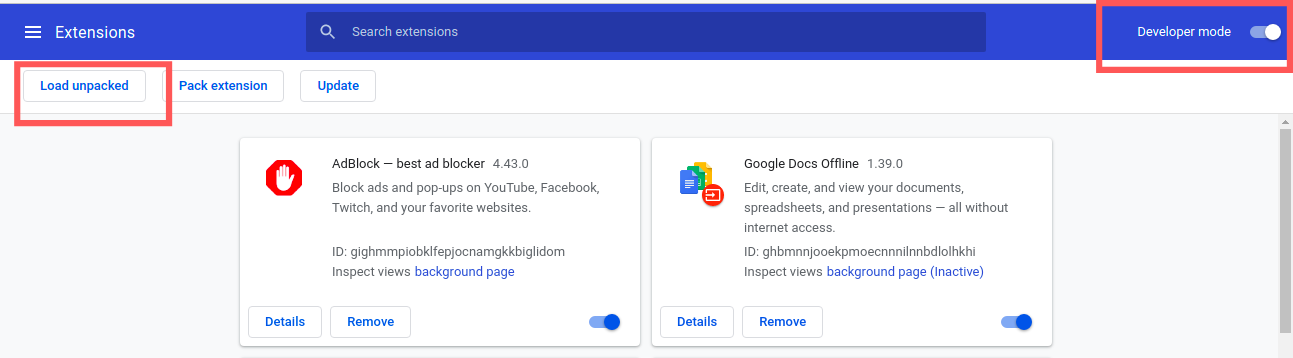
Once that’s done, you need to click the Load unpacked button which will allow us to load our project in the Chrome extension store.
Now, the extension is available in our Chrome extension store. You can also pin the extension in the browser as shown in the gif below:

This extension works only in your browser. If you want to publish it on the Chrome Web Store, you can follow this link.
Conclusion
If you have some HTML, CSS, and JavaScript knowledge, you can easily build Chrome extensions. I hope after reading this blog post, you will create some cool extensions.
chrome web store
What exactly is the Google Chrome Web Store?” You don’t have to be a newbie or Luddite to have this question on your mind. Although heavily covered in the media, the launch of the Google Chrome Web Store has many of us scratching our heads trying to figure out what to make of all this. In an attempt to find a relatable analogy, analysts in the mainstream media have likened it to the iPhone App Store, but for web apps—specifically, those that are optimized for Google Chrome. That kind of makes sense, but for those of you who have already visited the Google Chrome Web Store and “installed” a few web apps only to discover that they are, in essence, glorified bookmarks, the entire point of Google Chrome Web Store is still a bit fuzzy.
Chrome Web Store
Well, let me try to essay out the significance of this—though I’m not sure the answers we come up with will be satisfying in the way that you hoped or expected.
What is a Web App?
Before we discuss the reason for being for the Google Chrome Web Store, it’s best first to go back and discuss the origins of Google Chrome. Chrome was released as a beta in September 2008, and if you can remember back that far, you might recall that Chrome was never intended to be just a simple browser. Instead, Chrome is built on the premise that the Internet has evolved beyond simple web pages, and now the sites we visit function more like applications. From writing emails, editing documents and photos, chatting with friends, to tracking our personal finances, it seems that not only has all of our “stuff” migrated to the web but so too have the applications that manipulate our stuff. In this way, the web itself is slowly becoming more like an operating system. In fact, Google’s ultimate goal with Chrome is to develop it into an operating system (called Chrome OS) dedicated to giving you speedy access to the web and your web applications. In other words, Google is looking to cut out the clunky middle man—i.e., Windows, OS X, etc.—that gets in the way of where the real action is: the web.
All of this was explained conceptually back in 2008 in comic strip form, but now, that concept is coming to fruition. In fact, Google is already testing out the Chrome Notebook, a laptop that gives you “nothing but the web.” Because they argue, that’s all you need in this day and age.
So, understanding what a web app is and its significance requires a change in how we think about the Internet. To grasp what the Google Chrome Web Store is trying to do, we have to first come to grips with the notion that the web is an operating system.
So, think of it like this:
- There is Windows, there is Mac OS, there is Linux, and there is the Internet. Those are all operating systems.
- Each application only runs in the operating system it’s designed for.
- Microsoft Office 2010 is a Windows application.
- Garage Band is an OS X application.
- Nautilus is a Linux application.
- Gmail is a web application.
- Google Docs is a web application.
- Grooveshark is a web application.
- YouTube is a web application.
And so on…
What Will I Find in the Google Chrome Web Store?

You’ll find three different kinds of items in the Google Chrome Web Store: web apps (discussed above), Extensions, and Themes. Extensions and Themes should already be familiar to you if you’re a Chrome or Firefox user. These are essentially plug-ins that change or augment the functionality of the browser itself. These only work for Chrome.
But let’s talk more about the web apps you’ll find in Google Chrome. Web Store. There are actually three different kinds of web apps you’ll find in there currently:
Bookmarks
Your hunch that some of the “web apps” in the Google Chrome Web Store are nothing more than glorified bookmarks is true. For example, when you “install” the Gmail app into your Google Chrome browser, all it does is put a link to mail.google.com in your Apps section. This will be no different from accessing it mail.google.com from Firefox, Internet Explorer or RockMelt.

Of course, these “Bookmark” apps aren’t totally pointless. It all factors into Google’s goal in retraining your mindset to think of your browser as your “Start” button rather than an application. They want you to think of visiting a website as you would think of launching an application. By putting Gmail in your apps, it feels more like opening Outlook from your desktop. I bet that Google will do its best to deepen this analogy as they continue developing Chrome and the Google Chrome Web Store.
Integrated Extensions
Integrated extensions (not their official name) begin crossing the line between a simple web app that you can access from any browser (like Gmail and Facebook) and an application that can only be run in Chrome. Extensions, as you know, integrate into the browser bar, adding menus and buttons to your status bar. For example, the Weatherbug extension adds the temperature to the top-right hand corner. If you click it, you get more information served up by Weatherbug.com.

But now, Weatherbug has also created a Google Chrome Web Store app. Just like the Weatherbug extension installs itself into Google Chrome, delivering you content and data from Wetaherbug’s servers without actually requiring you to visit Weatherbug.com, the Weatherbug web app takes it the rest of the way and takes up the entire browsing window. But as you’ll notice, you aren’t at Weatherbug.com.

So, this is a real web application. We see the result of server-side processing, but it’s all happening outside the context of a webpage or URL, like www.WeatherBug.com. Think of it as the difference between opening the Facebook app on your iPhone versus navigating to Facebook.com on your iPhone’s browser.
Online/Offline Applications
At the opposite end of the spectrum of cross-browser web applications like Gmail and Facebook are full-blown applications. These applications integrate right into Google Chrome, actually treating it as an operating system and using Google Chrome’s API to function. These applications have web functionality, but you can still use them offline. To understand the difference, take a look at what happens when you try to access the Gmail “app” when you’re offline:

No dice. The Gmail app is unavailable when you’re offline.
But now, let’s check out this “standalone” app called Quick Note:

It still works. This application won’t work in Firefox or Internet Explorer. It’s exclusive to Google Chrome.
What Does Google Chrome Web Store Mean For the Future?
For now, the pickings for Chrome-only applications are slim. There’s TweetDeck, WriteSpace, New York Times, SlideRocket, Aviary, aToDo, and a few others. But based on these offerings, you can see what Google is going for. Google’s idea of a complete computing experience is where you turn on your computer. Instead of seeing your Windows desktop, replete with the taskbar, Windows Explorer, and your system tray, you’ll go directly into Chrome, and you’ll stay there.
- Instead of using Windows Explorer to browse local files and folders, you’ll use the web browser to access documents and folders you have stored on the cloud.
- Instead of editing your documents in Microsoft Office and then uploading them or emailing them, you’ll edit them directly on the web via Google Docs, where you can share them and collaborate on a single cloud-based file.
And all of this will be stitched together with your Google Account so that when you get a new computer or log in to your computer at home and open Google Chrome, all of your stuff is already there. No need to back things up, load up thumb drives or use up an entire spool of DVDs to burn your photos.
All of this seems somewhat compelling. It makes sense. It’s kind of how I use my computer now, though there are a few token applications and documents that I only use locally. But if Google has its way, these will become fewer and further between until local computing will be an anomalous relic, like a tape-based answering machine in a world of voicemail boxes.
However, I can’t say that I am ready to buy a computer that’s “only the web.” And this is coming from someone who bought a netbook in the last year and stores pretty much all my data in dropbox. The Google Chrome OS movement…after all, that’s what it is—a movement (they even have their own manifesto; see page 61)—is predicated on the belief that people want a device that does less than what computers do already. They are stripping out all of the junk that they say is useless or will be in the future and instead are offering web apps that they are asking us to accept as reasonable replacements.
While an iMac may be overkill for getting on Facebook and sharing poetry and photos with friends, I don’t see anything on the Google Chrome Web Store that’s going to do what Final Cut Pro does. But that’s OK; in fact, Apple is already embracing that use case by releasing the iPad. Light, simple, easy, and it comes ready with hundreds of thousands of applications, many of which already use the “cloud.” So part of me says Google is a bit late to the party on this one but then again… Oh, and then there’s the elephant in the room: security in the cloud, the state of which is as controversial as it is misunderstood.
There’s a lot to learn about what Google is up to with Chrome—and much of it is geared towards changing what you believe about the role of computers and the Internet. I’ll leave you with this video which explains the Google Chrome Web Store and obliquely outline’s Google’s vision for the future:
HOW-TO
How to Create HTML Signatures in Thunderbird without Learning HTML

What’s your email signature look like? One of those drab, plain text affairs with long, ugly URLs? Are you envious of the glorious, rich text signatures replete with images, hyperlinks, and digitized signatures that you get from your classier correspondences? Envy no more, good chum, because you can create your own HTML signature in Thunderbird without even learning
Step One
Create a new blank message in Thunderbird by clicking Write. We’re not actually sending an email here; we’re just using this message as a workspace.

Step Two
Type out your signature and format it using the formatting toolbar in the composition window. Make everything just like you want it to look in your signature.

Step Three
Personally, I like to include an image in my signature. If you’re pretty enough, you could even include a headshot, but lookin’ good isn’t really my department, so I’m going to use a logo. There are two ways to do this: attach it or embed an image on a web server. If you attach it, then every single email you send out will have your signature image attached. This’ll add a few KBs to your file size, which may or may not be an issue for you. But the real drawback is that your recipients will never know if you actually sent them an attachment other than your signature image. I don’t really like that, so I usually opt for the remotely hosted image. The drawback of that is that, by default, most web clients block remote images. But once you start emailing someone regularly, they can start accepting remote images, so really, that’s only an issue for your first message.
Anyway, to insert an image, click the Insert button in the formatting toolbar and click Image.

If you’re attaching your image, you can browse for it by clicking Choose File… If you’re using a remote image, copy and paste the location into the Image Location field. You can also add alt text and tooltip text if you’d like, or you can select Don’t use alternate text to forgo this.

Step Four
You’ll also probably want to include a link. To create a hyperlink, highlight the text you want to use as your anchor text, click the Insert button, and choose Link.

Type in the destination URL and click OK. I don’t recommend attaching the source of the link to the message.

Step Five
Once you have your signature just the way you like it, click Edit and choose Select All (or press CTRL-A on your keyboard). This will select all the text.

Step Six
Click the Insert menu and click HTML.

Step Seven
This will show a dialogue box with the raw HTML code for the signature you just created. Press CTRL-A and then CTRL-C to copy the raw HTML code to your clipboard. Click Cancel.

Step Eight
Click Tools and choose Account Settings.

Step Nine
In the box below Signature text, paste your HTML code. Make sure Use HTML is checked and click OK.

Now, when you compose a new message, your custom HTML signature will already be inserted.

Remember that if you’re embedding an image from a remote site, the recipient may have to enable images from your email address before they can see your logo.


That’s certainly not the only way to get a rich text HTML signature into Thunderbird, but in my opinion, it’s the easiest, especially for those who feel daunted by raw HTML code. With this method, you can create your signature in a WYSIWYG (what you see is what you get) and save it for future use.
Conclusion
Let us know your thoughts in the comment section below.
Check out other publications to gain access to more digital resources if you are just starting out with Flux Resource.
Also contact us today to optimize your business(s)/Brand(s) for Search Engines