With the Chrome Extension For Office 365, you can easily access and use your Office 365 apps within your browser. The extension makes it easy to access your calendar and documents, connect with colleagues, and stay in the know about the latest news—all with just a few clicks.
The Chrome Extension For Office 365 also helps you save time by letting you quickly search or translate content, manage your to-do list, take notes, and have quick access to the files you’ve recently used across any of your devices—so you can get back to work faster.
Table of Contents
Chrome Extension For Office 365
Those who spend a lot of time on the Internet and also have to work with Microsoft Office files or services generally spend a lot of time switching between their web browsers and Office suite applications. Copying a lot of files and constantly moving from one window to another (or one desktop to another) usually cause much hassle and waste your time. That’s why I’ve decided to show you the most effective solution for dealing with Office-related files and services that is made directly from your Chrome browser. Here are the top 5 extensions to help you achieve this goal. Just to mention, all of these add-ons are free, so even if you end up not liking them, you won’t spend a dime.
Office Online
Office Online
As far as I’m concerned, Office Online is the best Chrome tool to help you deal with Office files. This extension comes from Microsoft itself, as the company has finally decided to admit Chrome’s supremacy over Edge or Internet Explorer. Office Online is an add-on that allows you to create Word, Excel, PowerPoint, OneNote and Sway files or edit any of the previously mentioned formats, directly in your web browser. The only disadvantage is that the output files can only be saved on an OneDrive or OneDrive Business accounts, so you will need to have one of those in order to use the extension.
Word Online
Word Online
In case Word is the only Office tool that you actually use, there’s no need for you to install the entire Office add-on. Word Online is a Chrome app that lets you view, edit and create .DOC and .DOCX files, directly in Google’s browser. Just like in the previous case, this tool also saves your work on your OneDrive account and is also a great solution for collaborative work. As I have already said, Word Online is actually an app for Chrome and not an extension, but the functionality was too important for me to ignore it on a simple technicality.
Office Editing for Docs, Sheets & Slides
Office Editing for Docs Sheets and Slides
What do you do when your friends or coworkers prefer using Microsoft Office applications, but you like working with Google’s productivity suite or simply don’t have MS Office installed? The answer is quite simple: you use Office Editing for Docs, Sheets & Slides. This extension allows you to view and edit Word, Excel, PowerPoint and Sway files, but when you modify them you will use the Docs, Sheets or Slides interface (depending on the format that you’re working on) to do so. To use this extension, all you have to do is to install it, then drag and drop your Office file into Chrome’s window. Lastly, the output file can be saved with its original extension or in a format specific to Google’s suite.
Open with Microsoft Office Online
Open with Microsoft Office Online
In case you’re not interested in editing files, but you just need a quick and reliable way to view online or publicly accessible Office files, the Open with Microsoft Office Online extension is exactly what you need. This tool works with documents (DOC or DOCX), spreadsheets (XLS or XLSX) and presentations (PPT, PPS, PPTX). The fact that it only works on online and publicly accessible files can be a bit inconvenient, but it’s still a nice tool to have around. As far as I know, the biggest disadvantage for Open with Microsoft Office Online is that it doesn’t seem to work on Google’s search results pages.
Notifier for Mail Microsoft Outlook
Notifier for Mail Microsoft Outlook
And last on out list is an extension that is really useful for those who like using Chrome while also employing Microsoft’s Outlook email client. As you can easily guess from its name, Notifier for Mail Microsoft Outlook will let you know whenever a new email has arrived on your Hotmail portal. The add-on provides a simple button to the right of your address bar, showing you when there’s a new message and the number of mails that you’ve received since the last time you checked your inbox. Simply click the respective button and you will be automatically taken to your Outlook account.
Now, when you’ve seen the best five Chrome extensions for Microsoft Office users, you might also want to check out these seven Chrome extensions, which make the Internet easier to use or find out what are the best timesaving tips for Word users.
how to create an extension on chrome
If you are a Google Chrome user, you’ve probably used some extensions in the browser.
Have you ever wondered how to build one yourself? In this article, I will show you how you can create a Chrome extension from scratch.
Table Of Contents
- What is a Chrome Extension?
- What will our Chrome Extension Look Like?
- How To Create a Chrome Extension
- Creating a manifest.json file
- Conclusion
What is a Chrome Extension?
A chrome extension is a program that is installed in the Chrome browser that enhances the functionality of the browser. You can build one easily using web technologies like HTML, CSS, and JavaScript.
Creating a chrome extension is similar to creating a web application, but it requires a manifest.json file which we will discuss in the last section of this post.
What Will our Chrome Extension Look Like?
As you can see, the above chrome extension displays the latest data on Coronavirus (COVID-19) in the UK. We will be looking into how to create this extension in this blog post.
Here, we will be using the https://api.coronavirus.data.gov.uk/v1/data API in order to fetch data. We will only display the latest record for the simplicity of this post.
The complete source code of this project can be found on GitHub.
How to Create a Chrome Extension
First of all, we need to create an empty folder where we will add our HTML, CSS, and JavaScript files.
Inside the folder, let’s create an index.html file with this HTML boilerplate code:
<!DOCTYPE html>
<html>
<head>
    <title>Covid-19 Stats- UK</title>
    <meta charset="utf-8">
</head>
<body>
</body>
</html>
Now, let’s add a link to the Bootstrap CDN in the head tag. We will be using the Bootstrap framework here so that we don’t have to write some extra CSS in this example.
<head>
    <title>Covid-19 Stats- UK</title>
    <meta charset="utf-8">
    <link href="https://cdn.jsdelivr.net/npm/bootstrap@5.1.3/dist/css/bootstrap.min.css" rel="stylesheet">
</head>
In the demo, we saw that the records are displayed as a table. So now we need to work on creating a table.
<!DOCTYPE html>
<html>
<head>
    <title>Covid-19 Stats- UK</title>
    <meta charset="utf-8">
    <link href="https://cdn.jsdelivr.net/npm/bootstrap@5.1.3/dist/css/bootstrap.min.css" rel="stylesheet">
</head>
<body>
    <div class="container mt-3" style="width: 450px;">
        <h2 class="text-center">Covid Latest Report-UK</h2>
        <table class="table table-bordered">
            <thead>
            <tr>
                <th>Date</th>
                <th>Country</th>
                <th>Confirmed</th>
                <th>Deaths</th>
            </tr>
            </thead>
            <tbody>
            <tr>
                <td id="date"></td>
                <td id="areaName"></td>
                <td id="latestBy"></td>
                <td id="deathNew"></td>
            </tr>
            </tbody>
        </table>
    </div>
</body>
<script src="script.js"></script>
</html>
The code above creates a table with a width of 450px. There are four different headings in a table: Date, Country, Confirmed, and Deaths.
Here, you can see that each table data td has been assigned different IDs. We will be using the value of these IDs in JavaScript to update the table data. Also, here we have loaded the JavaScript in the end after loading all the HTML content.
Now, since the table has been displayed, we need to work on writing JavaScript in order to fetch data from the API.
Let’s create a script.js file and add the following code:
async function fetchData() {
    const res=await fetch ("https://api.coronavirus.data.gov.uk/v1/data");
    const record=await res.json();
    document.getElementById("date").innerHTML=record.data[0].date;
    document.getElementById("areaName").innerHTML=record.data[0].areaName;
    document.getElementById("latestBy").innerHTML=record.data[0].latestBy;
    document.getElementById("deathNew").innerHTML=record.data[0].deathNew;
}
fetchData();
Now, let’s break down the above code:
- Here we are using the async function called
fetchData. - The data is being fetched from the https://api.coronavirus.data.gov.uk/v1/data API.
- The JSON data is stored in a variable called
record. - The HTML content of td with ids
date,areaName,latestByanddeathNeware updated by the corresponding values of API.
If we check the browser, we will be able to see the following result.
The data is being fetched from the API and it keeps on updating as soon as the data in API changes.
Manifest.json File
As we discussed earlier, building a Chrome extension is similar to building any web application. The only difference is that the Chrome extension requires a manifest.json file where we keep all the configurations.
The manifest.json file contains all the necessary information required to build the Chrome extension. It is the first file the extension checks and everything is loaded from this single file.
Now, let’s create a manifest.json file in the root folder and add the following code:
{
    "name": "Covid-19 Stats UK",
    "version": "1.0.0",
    "description": "latest covid data of UK",
    "manifest_version": 3,
    "author": "Sampurna Chapagain",
    "action":{
        "default_popup": "index.html",
        "default_title": "Latest Covid Report"
    }
}
Manifest.json
Our manifest.json file contains the value of name, version, description, manifest_version (3 in this case, which is the latest manifest version), author, and action fields. In the action field, there’s the value for default_popup which contains the path to the HTML file which is index.html in this example.
You can have a look here to see all configurations of a manifest.json file.
Now, since we’ve also added the manifest.json file we are ready to add this project as an extension in our Chrome browser.
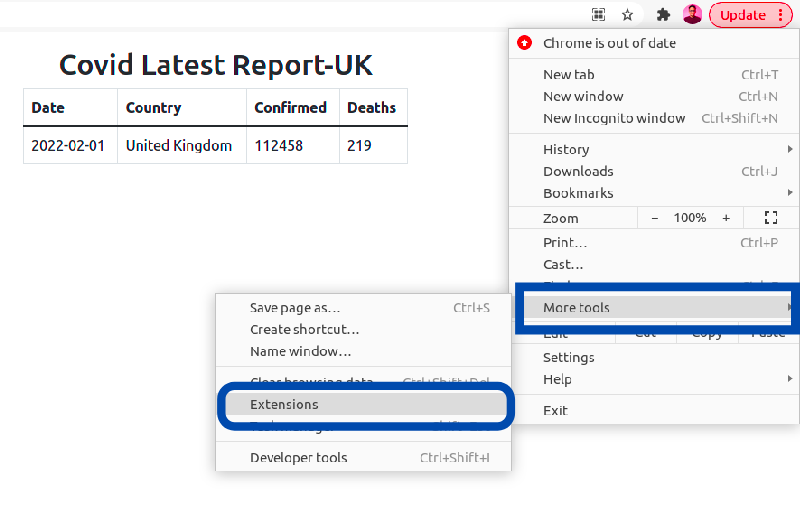
For that, we need to go to Select More Tools and then choose Extensions from the browser menu as shown in the picture below:
After choosing Extensions, it redirects to the extensions page in Chrome. Make sure to enable the Developer mode here.
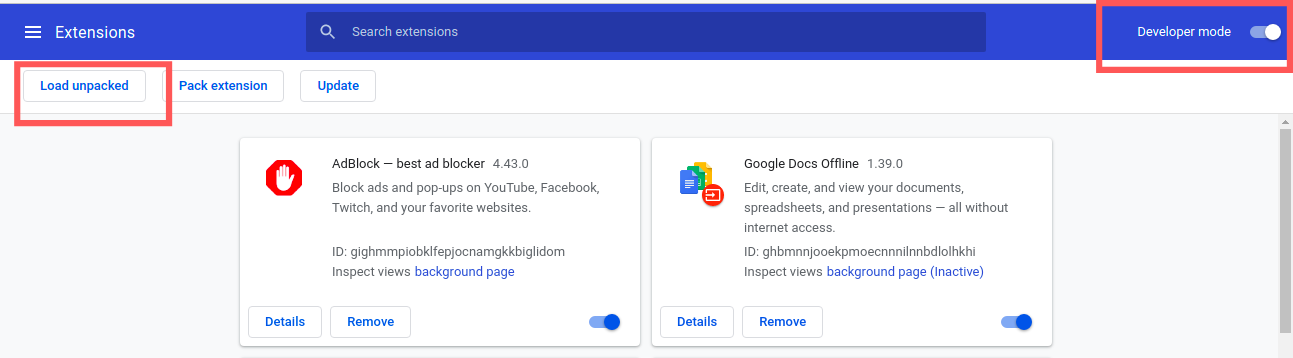
Once that’s done, you need to click the Load unpacked button which will allow us to load our project in the Chrome extension store.
Now, the extension is available in our Chrome extension store. You can also pin the extension in the browser as shown in the gif below:

This extension works only in your browser. If you want to publish it on the Chrome Web Store, you can follow this link.
Conclusion
If you have some HTML, CSS, and JavaScript knowledge, you can easily build Chrome extensions. I hope after reading this blog post, you will create some cool extensions.
Conclusion
Let us know your thoughts in the comment section below.
Check out other publications to gain access to more digital resources if you are just starting out with Flux Resource.
Also contact us today to optimize your business(s)/Brand(s) for Search Engines