If you’re looking for a place to find some new recipes, then look no further than this blog. Here we have a large collection of recipes for different foods and meals. You can find recipes for both breakfast, lunch and dinner. Each recipe has a list of ingredients and directions on how to make the dish. You can also see pictures of the food that shows what it should look like when it is done.
This website is useful because it makes finding new things to eat easy. It is also helpful if you need ideas on what to cook for dinner or any other meal.
The site can be used by anyone who likes cooking or wants to learn how to do so. It is also useful if you want to try out new dishes but don’t know any recipes that are good.
Chrome Extension For Recipes
Through the years, recipes have come in different forms. Kitchens used to be well stocked with entire recipe book collections. There were recipe card holders filled with stained index cards with hand-written recipes from your parent or grandparent.
These days recipes are mostly electronic, scattered across many different websites. So how do you keep all of your favorite recipes in all of these different forms organized? Using online recipe organizers of course!
Why keep entire cookbooks when you only like a small batch of recipes in them? Why bookmark half a dozen websites when you can just export your favorites to your own personal digital recipe organizer? In this article, we’ll show you a list of cloud-based recipe organizers you can use to do just that.
- BigOven
If you don’t try any other online recipe organizer on this list, you should at least try this one. The free version doesn’t give you access to the full menu planner and other features, but you do get access to the recipe library where you can add your own recipes. There are four ways you can do this.
bigoven import recipes
Paste the URL to the recipe page from the site where you want to clip the recipe.
Write your recipe manually using a simple form.
Copy and paste the recipe from a text document.
Scan and upload a photo of your recipe card.
Some of these options are faster than others. For example, if you paste a recipe page and select Import, BigOven will scrape the text from the page. You’ll then need to highlight and specify the title, summary, ingredients, and instructions so that that text will get imported into your BigOven stored recipe.
bigoven recipe import
Taking a picture of a recipe (either from a recipe card or a cookbook) takes a little longer. It appears BigOven doesn’t use optical character recognition (OCR) technology. Instead they have staff who literally transcribe the recipes for you.
It’s a lot easier adding recipes from the mobile app. In just a few steps you can clip a recipe from a URL or scan the recipe directly in using your phone.
bigoven mobile app
Again, scanned photos aren’t added instantly. You’ll get an email when BigOven is done transcribing and it’s added to your library.
You can start using BigOven at the website, or download the app for iOS, Android, or Windows Phone.
- ChefTap
ChefTap is another great cloud and mobile based solution to keep all of your favorite recipes stored in your own private collection. You need to use the Android or iOS app to register and sign up for an account. Once you’re registered and signed in, tap Sync to sync the mobile app with your cloud account.
The free account lets you store up to 100 recipes, and doesn’t let you access the menu planning feature. However, since most people have nowhere near 100 recipes in their collection, this should be suitable for most users.
Web clipping is a Pro feature on the ChefTap website, but you can manually add any recipes you like. To copy sites from a website you’ll need to copy and paste all of the fields.
cheftap website
The real value with ChefTap comes from the app. Once you install the app on your mobile device, you can import recipes in several ways.
cheftap mobile app
Use the built in browser to open recipe sites, log in, and import recipes
Import recipe boxes from compatible recipe sites like Allrecipes (the US or UK version), or Epicurious.
Import your own recipes from text files
Paste a URL to a recipe page
Type in your recipe manually
Because you can’t use a lot of these features on the website itself, ChefTap isn’t quite as good as BigOven. But if you prefer using your mobile device anyway, then it could be the one you’ll prefer.
You can use the ChefTap website directly, or download the app for Android or iOS from the main page of the website.
- Paprika
Paprika is a bit different than the other cloud-based online recipe organizers listed on this page. There is no website to use. Instead, you can download the software for a Windows or Mac computer, as well as for Android or iOS. Then all of your recipes are synced via the cloud across all devices.
Keep in mind that while Paprika offers a free trial, the software isn’t free. You’ll need to pay a one-time fee of $29.99 to use the software.
With that said, it’s well worth the price. Paprika is one of the most full featured recipe organizers of any. It comes with a built-in browser where you can search all the major recipe sites and just select the Download button at the bottom to import the recipe into your recipe organizer.
downloading recipes in paprika desktop
Paprika seems to do a better job than most others at pulling in the right information and putting them into the correct fields.
downloaded recipe in paprika desktop
The app includes:
An excellent recipe organizer with well formatted recipes
Grocery lists you can print, email, or just sync with your mobile devices
Pantry organizer you can use to log ingredients you have on hand
Meal planner for pulling in recipes for each meal
A menu planner for planning out your daily meals
From the Paprika main page, you can download the app for iOS, Android, Mac, and Windows. All of them sync with one another so you can add recipes and menus on your desktop and have them available on your mobile when you’re at the store.
- Evernote
Evernote used to have a unique offering called Evernote Food, but it has since been discontinued. Part of the reason for that might be that Evernote itself serves perfectly fine as an online recipe organizer.
If you look at the features Evernote offers, you’ll see that it can do nearly everything other recipe organizers do. You can type in or copy over your own text based recipes. You can also install the Evernote Web Clipper extension for Chrome to capture recipes on any recipe website you come across.
evernote web clipper
Bring these recipes in using any format you like. Import the full web page, use article format, or bring it in using a simplified article format. This ensures that you get an article saved in Evernote that’s cleanly formatted and easy to use.
evernote recipes
You can also use the Camera option in the Evernote mobile app to capture a photo of your recipe cards for digital recipe storage.
If you don’t want to start using a new online recipe organizer and you’re already using Evernote, then you already have everything you need.
Use the Evernote web page, or install Evernote on your Windows desktop, iOS device, or your Android device. Just like all of the other options listed here, your saved recipes are synced and accessible across all devices.
- OrganizEat
OrganizeEat is a recipe organizer that is mobile-based only, available for Android or iOS devices. There is a beta web version available but is no longer accepting signups. Once the beta version goes live, access will require a subscription.
The mobile app lets you store up to 20 recipes for free. There are several ways you can do this.
When you launch the app and tap Add a New Recipe, you’ll see the following options.
Photo: Take and store a snapshot of a recipe from cookbooks or recipe cards
Web: Import a recipe from any online recipe website
Typing: Type in your own recipe manually
To do this, just tap Add a New Recipe at the top of the app and you’ll see the options above. Tap the Recipe from Photo option to capture an image of a photo in a cookbook or recipe card.
adding recipes in organizeat
You can crop the photo to only include the recipe itself.
This app only stores the photo, it doesn’t transcribe any text from the photo.
The most convenient and easy way of collecting recipes into your OrganizEat online recipe manager is to import it from the web. When you do this it’ll take you to an embedded browser where you can browse recipe sites and then select Save to capture that recipe.
importing recipes in organizeat
OrganizeEat does a great job importing the components of the recipe and putting them into the OrganizeEat recipe format.
Visit the main page of OrganizeEats to download either the iOS or Android app.
- Copy Me That!
A few of the online recipe organizers on this list have a subscription or cost. Thankfully, Copy Me That! doesn’t. When you first sign in, you’ll need to select the Get button to add the Copy Me That! extension to your browser.
Select Create Recipe from the main page of the website (once you log in) to manually add your recipe to your collection.
manually enter recipe copy me that
A faster way to add recipes is to visit your favorite recipe sites and use the Copy Me That! Chrome extension icon.
copy me that web extension
This imports the recipe in a clean and easy to read format inside your Copy Me That account.
copy me that recipe added
Just select Confirm to complete the import and save the recipe.
Other areas of the site include:
Recipes: Your collection of recipes in Pinterest Style list format
Shopping List: Quickly add ingredients from your recipe to your shopping list
Meal Plan: Organize your recipes into meals for each day of the week
Organize your recipes with tags and filters. You can also share via email, and sync your recipes across all devices.
Access the browser based organizer on the Copy Me that website. You can also download the app for Android or on the Apple Store.
- Recipe Keeper
The Recipe Keeper app is another recipe organizer that’s app based. Meaning while there’s no website, you can download the free app for your iOS device, Android phone, your Mac or your PC.
As with other recipe apps on this list, the saved recipes sync across all devices. However, Recipe Keeper is far easier to use, and much more aesthetically pleasing than most of the others on this list.
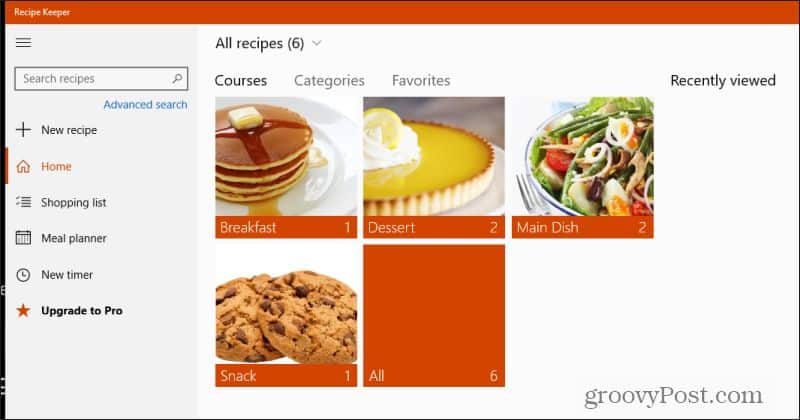
The main page is where you’ll find all your recipes organized into food genre.
recipe keeper main page
Adding a new recipe to your collection is as simple as selecting New recipe.
You can:
Add a recipe manually
Import from the web
Scan one from a photo
Scan a PDF copy of a recipe
adding recipe in recipe keeper
The manual entry is a simple form where you work your way from left to right. Fill in the recipe details, ingredients, directions and notes.
recipe keeper manual entry
Importing from the web is impressive. There’s an embedded web browser that takes input from the search field inside Recipe Keeper. The search will return recipes from external websites. Browse to your recipe and the app will automatically detect the recipe and fill in all of the correct fields.
recipe keeper web import
Just select Save. This will import the recipe into your collection. You’ll notice that recipes here are beautifully formatted. The app even automatically brings in an image of the recipe from the recipe site, if one is available.
recipe keeper main recipe
Choose Your Online Recipe Organizer
Not every cloud based recipe organizer is going to be perfect for everyone. Some people may prefer more mobile features. Other people may prefer a stronger web app or Chrome extension features.
The best way to choose is to try a few that look like what you need. If the online recipe organizer provides everything you need it for, then that’s the perfect one for you.
how to use extension on chrome
Install and manage extensions
You can customize Chrome on your desktop by adding extensions from the Chrome Web Store.
Install an extension
Important: You can’t add extensions when you browse in Incognito mode or as a guest.
Open the Chrome Web Store.
Find and select the extension you want.
Click Add to Chrome.
Some extensions will let you know if they need certain permissions or data. To approve, click Add extension.
Important: Make sure you only approve extensions that you trust.
To use the extension, click the icon to the right of the address bar.
If you’re using a computer through your work or school, your organization might block some extensions.
Install on your phone
On your phone, open the Chrome app Chrome. If you haven’t yet, sign in to Chrome.
Find the extension you want.
Tap Add to Desktop.
Confirm by tapping Add to Desktop.
The next time you open Chrome on your computer, you’ll see a message that the extension was installed. If the extension needs some permissions, you’ll be asked. To approve, click Enable extension.
Install with a Windows or Mac application
Sometimes, when you install an application on Windows or Mac, it also installs a Chrome extension. The next time you open Chrome:
To grant permissions and use the extension, click Enable.
To delete the extension, click Remove.
Install with Enhanced Safe Browsing
For additional protection when you install a new extension from the Chrome Web Store, you can use Enhanced Safe Browsing. If you enable Enhanced Safe Browsing in Chrome, it warns you when an extension you want to install isn’t trusted. Extensions are considered trusted when they’re built by a developer who follows the Chrome Web Store Developer Program Policies.
For new developers, it generally takes a few months to become trusted. Eventually, we strive for all developers with compliant extensions to reach this status upon meeting our developer program policies.
Install trusted extensions
When you try to install an extension, a dialog appears.
If the extension you’re about to install isn’t trusted by Enhanced Safe Browsing, it says “This extension is not trusted by Enhanced Safe Browsing.”
To install the extension anyways, click Continue to install.
To abort the installation, click Close.
If the extension is trusted by Enhanced Safe Browsing, click Add extension to complete the installation.
Manage your extensions
On your computer, open Chrome.
At the top right, click More More and then More tools and then Extensions.
Make your changes:
Turn on/off: Turn the extension on or off.
Allow incognito: On the extension, click Details. Turn on Allow in incognito.
Fix corruptions: Find a corrupted extension and click Repair. Confirm by clicking Repair extension.
Allow site access: On the extension, click Details. Next to “Allow this extension to read and change all your data on websites you visit,” change the extension’s site access to On click, On specific sites, or On all sites.
Remove possible malware
If you repaired an extension but it’s still corrupted, a suspicious program might be changing this extension’s files.
On Windows computers, Check your computer for malware.
On Windows, Mac, or Linux computers, run an antivirus or anti-malware software. Remove any software programs that may be affecting Chrome.
On all computers, repair the extension:
On your computer, open Chrome.
At the top right, click More More and then More tools and then Extensions.
Find a corrupted extension and click Repair. Confirm by clicking Repair.
If this doesn’t work, visit the Chrome Help Forum and share your situation with us.
Let extensions read and change site data
Some extensions need permission to read and change site data. You can change your extensions’ permissions anytime.
On your computer, open Chrome .
At the top right, click Extensions .
Click More Organize and then point to “This can read and change site data.”
Decide which permission to give the extension:
When you click the extension: This setting only allows the extension to access the current site in the open tab or window when you click the extension. If you close the tab or window, you’ll have to click the extension to turn it on again.
On [current site]: Allow the extension to automatically read and change data on the current site.
On all sites: Allow the extension to automatically read and change data on all sites.
Add or remove access to a specific site
On your computer, open Chrome.
At the top right, click More More and then More tools and then Extensions.
On the extension, click Details.
Under “Permissions,” add or remove a site:
Add: To the right of “Allowed sites,” click Add.
If you don’t see this option, change “Allow this extension to read and change all your data on websites you visit” to On specific sites.
Remove: To the right of the site, tap More More and then Remove.
Uninstall an extension
To the right of your address bar, look for the extension’s icon. Right-click the icon and select Remove from Chrome.
If you don’t see the extension’s icon:
On your computer, open Chrome.
At the top right, click More More and then More tools and then Extensions.
On to the extension you want to remove, click Remove.
Confirm by clicking Remove.
Use extensions on any computer
To use your extensions on any computer, sign in to Chrome.
Arrange on your toolbar
To the right of your address bar, find your extensions’ icons.
On your computer, open Chrome.
Drag the extension’s icon to its new place.
Hide extensions
To hide individual extensions:
Right-click the icon.
Select Unpin.
To see your hidden extensions: Click Extensions .
Show extensions
To bring hidden extensions back to your toolbar:
Select Extensions .
Find the hidden extension.
Select Pin Pin.
Important: Some extensions don’t have this option.
Conclusion
Let us know your thoughts in the comment section below.
Check out other publications to gain access to more digital resources if you are just starting out with Flux Resource.
Also contact us today to optimize your business(s)/Brand(s) for Search Engines