I have been working in IT for over 10 years and spent 8 of those years at its intersection with healthcare, so I am well-versed in the necessity of automation and the challenges that come with it.
UiPath is a powerful tool for automating tedious and repetitive processes. It allows you to save time and money by focusing on more important business objectives, rather than focusing on how to get from point A to point B.
The UiPath suite of products is amazing in its own right, but they also offer a developer API that can be used to create custom activities like the ones listed here.
Chrome Extension For Uipath
The UiPath Extension for Chrome is bundled in the Studio setup. It is possible to install it even with no Internet access. The extension is installed globally if Google Chrome is installed system-wide, and per user if the browser is also installed this way. Please note that you may be asked to close Google Chrome while installing the extension, so be sure to save any pending work.
📘Note:
It is recommended to close all Chrome instances before installing the extension.
From the Studio Installer
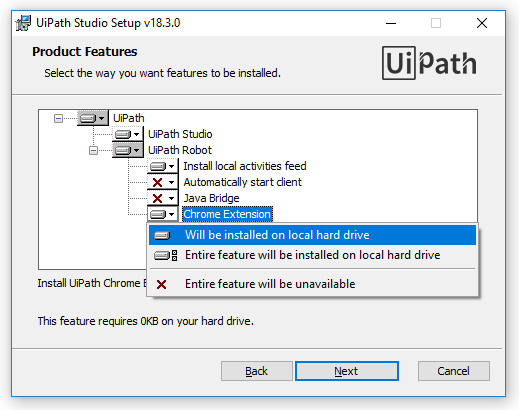
- Run the Studio Installer and click Advanced in the License Agreement section. The Product Features window is displayed.
- Click the Chrome Extension drop-down and choose to install this feature.
- Click Next. Studio setup continues while also installing the extension for Chrome.
From UiPath Studio
- Access the Tools page from the Studio Backstage View. The extensions you can install become visible.
- Click the Chrome button. A confirmation dialog box is displayed.
- Open Google Chrome and click the Add extension button. The extension is now installed and activated.
Please note that file access is disabled by default. To enable it:
- Click the Side Navigation Bar
 > More Tools > Extensions. The
 chrome://extensions/page is displayed. - In the
chrome://extensions/page, navigate to the UiPath extension. - Click the Details button. The UiPath Chrome extension details page is displayed.
- On this page, select the Allow access to file URLs check box.

From the Command Prompt
- Click the Windows Start button and type
cmdin the search field. - Right click on Command Prompt and run it as administrator.
- Change the directory to the UiPath installation folder (
cd C:\Program Files (x86)\UiPath\Studio\UiPath). - Use the
SetupExtensions.execommand to run the corresponding file, and use one of the following arguments:/chromeglobal– installs the UiPath Extension for Chrome per system./chrome– repairs the UiPath Extension for Chrome per system if available. Otherwise it installs the it per user.
📘Note:
The extension for Chrome can also be installed via Policy from the command line with the SetupExtensions tool.
- Open Google Chrome and click the Add extension button. The extension is now installed.
Please note that file access is disabled by default. To enable it:
- Click the Side Navigation Bar > More Tools > Extensions. The
chrome://extensions/page is displayed. - In the
chrome://extensions/page, navigate to the UiPath extension. - Click the Details button. The UiPath Chrome extension details page is displayed.
- On this page, select the Allow access to file URLs check box.
As of 2018.3, installing the UiPath Extension for Chrome does not remove older versions. This does not interfere with your new or old automation projects. You can choose the Extension for Chrome to activate from the chrome://extensions/ page by simply clicking the Toggle Switch button of the corresponding extension.
uipath extension for chrome not working
Recently, I’ve installed the UiPath Chrome extension. I found out that it was not working properly. So, I did some research to found out the cause and fix it.
I discovered I wasn’t the only person having this issue. Others reported the same problem.

We detected that you are trying to capture in a browser and your extension is not enabled. Please enable UiPath extension before continuing.
So, the UiPath extension is enabled but you still get the Info message. I tried to reinstall the UiPath Studio. Then, to reinstall the Chrome extension. In the end, I restarted my machine. It didn’t work.
After more online research I found the solution. It was something related to Windows Registry.
UiPath Chrome extension troubleshooting
Check your Windows username
Check the Google Chrome version
Check if the UiPath Chrome extension is enabled
Check if the Chrome extension process is running
Reinstall the extension if the ChromeNativeMessaging.exe is missing
Get the UiPath Chrome extension ID
Check the Registry Editor – the solution
Check your Windows username
If your Windows username contains non-English characters and you have installed the UiPath Community Edition on your machine, search no more. This is the root of your issue. The Community Edition installs under C:\Users\[username].
The solution is to uninstall the Community Edition and install the Enterprise trial version. The later one installs under C:\Program Files(x86).
Check the Google Chrome version
Make sure you have the Google Chrome version 64 installed on your machine. From the Customize and Control Google Chrome menu select Help > About Google Chrome.

Check if the UiPath Chrome extension is enabled
From Chrome navigate to chrome://extensions/

Enable the following options: Allow in incognito and Allow access to file URLs.

Check if the Chrome extension process is running
Open Task Manager and look for the ChromeNativeMessaging.exe process under the Google Chrome Application. (in my case the process was missing)

Reinstall the extension if the ChromeNativeMessaging.exe is missing
Remove the Chrome extension and install it from the Studio. Open UiPath Studio, select Tools > Extensions > Chrome Extension.

The following message will appear:
UiPath Chrome extension was installed for current user. Make sure you enable it in Chrome (check chrome://extensions) and then restart the browser.

In some cases, even with a successful message, you end up finding that the extension was not installed. If this happens, install the extension from the Chrome web store. Search for ‘UiPath’ and install it from there.

Get the UiPath Chrome extension ID
Go to chrome://extensions/ and enable Developer mode.

Take note of the extension ID.

Check the Registry Editor – the solution
Open the Registry Editor. Use the following key combination Windows key + R to open the Run command and type regedit.

Navigate to Computer\HKEY_CURRENT_USER\Software\Google\Chrome\NativeMessagingHosts\com.uipath.chromenativemsg

The Default REG_SZ value points to a JSON file (in my case C:\Users\PC1\AppData\Local\UiPath\crx_manifest.json).
Open the file with Notepad and verify 2 things:

First, check the path property. The path should exist and point to the ChromeNativeMessaging.exe application. (in my case C:\Program Files (x86)\UiPath\Studio\UiPath\BrowserExtension)

Second, check the chrome-extension number under the allowed_origins property matches the ID of the Chrome extension. (in my case this was the issue. The chrome-extension number didn’t match the extension ID. After I replaced the value with the correct one, the UiPath extension started working. You can check the Task Manager again. This time the Chrome Native Messaging process was up and running.)

Conclusion
Let us know your thoughts in the comment section below.
Check out other publications to gain access to more digital resources if you are just starting out with Flux Resource.
Also contact us today to optimize your business(s)/Brand(s) for Search Engines