In this blog, we’ll be giving you the inside scoop on how to make a chrome extension for desktop.
The first step is to make the manifest file of your extension. This file will tell Chrome important information about your extension, like its name and which permissions it needs. This allows you to store data or modify data in the user’s computer. You can also make changes to the browser itself. It’s called manifest.json because its a JSON file, meaning it’s a text file that contains data that is stored in key/value pairs.
Next, you want to configure your extension using HTML and JavaScript files. Create a folder for your extension, and add an HTML file called popup.html and a JavaScript file called popup.js. This folder will be where all of your code for the extension lives once it’s ready to use on Chrome.
Chrome Extension For Desktop
Install and manage extensions
You can customize Chrome on your desktop by adding extensions from the Chrome Web Store.
Install an extension
Important: You can’t add extensions when you browse in Incognito mode or as a guest.
Open the Chrome Web Store.
Find and select the extension you want.
Click Add to Chrome.
Some extensions will let you know if they need certain permissions or data. To approve, click Add extension.
Important: Make sure you only approve extensions that you trust.
To use the extension, click the icon to the right of the address bar.
If you’re using a computer through your work or school, your organization might block some extensions.
Install on your phone
On your phone, open the Chrome app Chrome. If you haven’t yet, sign in to Chrome.
Find the extension you want.
Tap Add to Desktop.
Confirm by tapping Add to Desktop.
The next time you open Chrome on your computer, you’ll see a message that the extension was installed. If the extension needs some permissions, you’ll be asked. To approve, click Enable extension.
Install with a Windows or Mac application
Sometimes, when you install an application on Windows or Mac, it also installs a Chrome extension. The next time you open Chrome:
To grant permissions and use the extension, click Enable.
To delete the extension, click Remove.
Install with Enhanced Safe Browsing
For additional protection when you install a new extension from the Chrome Web Store, you can use Enhanced Safe Browsing. If you enable Enhanced Safe Browsing in Chrome, it warns you when an extension you want to install isn’t trusted. Extensions are considered trusted when they’re built by a developer who follows the Chrome Web Store Developer Program Policies.
For new developers, it generally takes a few months to become trusted. Eventually, we strive for all developers with compliant extensions to reach this status upon meeting our developer program policies.
Install trusted extensions
When you try to install an extension, a dialog appears.
If the extension you’re about to install isn’t trusted by Enhanced Safe Browsing, it says “This extension is not trusted by Enhanced Safe Browsing.”
To install the extension anyways, click Continue to install.
To abort the installation, click Close.
If the extension is trusted by Enhanced Safe Browsing, click Add extension to complete the installation.
Manage your extensions
On your computer, open Chrome.
At the top right, click More More and then More tools and then Extensions.
Make your changes:
Turn on/off: Turn the extension on or off.
Allow incognito: On the extension, click Details. Turn on Allow in incognito.
Fix corruptions: Find a corrupted extension and click Repair. Confirm by clicking Repair extension.
Allow site access: On the extension, click Details. Next to “Allow this extension to read and change all your data on websites you visit,” change the extension’s site access to On click, On specific sites, or On all sites.
Remove possible malware
Let extensions read and change site data
Some extensions need permission to read and change site data. You can change your extensions’ permissions anytime.
On your computer, open Chrome .
At the top right, click Extensions .
Click More Organize and then point to “This can read and change site data.”
Decide which permission to give the extension:
When you click the extension: This setting only allows the extension to access the current site in the open tab or window when you click the extension. If you close the tab or window, you’ll have to click the extension to turn it on again.
On [current site]: Allow the extension to automatically read and change data on the current site.
On all sites: Allow the extension to automatically read and change data on all sites.
Add or remove access to a specific site
On your computer, open Chrome.
At the top right, click More More and then More tools and then Extensions.
On the extension, click Details.
Under “Permissions,” add or remove a site:
Add: To the right of “Allowed sites,” click Add.
If you don’t see this option, change “Allow this extension to read and change all your data on websites you visit” to On specific sites.
Remove: To the right of the site, tap More More and then Remove.
Uninstall an extension
To the right of your address bar, look for the extension’s icon. Right-click the icon and select Remove from Chrome.
If you don’t see the extension’s icon:
On your computer, open Chrome.
At the top right, click More More and then More tools and then Extensions.
On to the extension you want to remove, click Remove.
Confirm by clicking Remove.
how to create desktop shortcut for chrome extension
If you want a quick and easy way to access your favorite websites, you can create a desktop shortcut that opens any page instantly. Then you can even add a website shortcut to your Start Menu and Taskbar on a Windows 10 computer or your Launchpad and Dock on a Mac. Here’s how to create a desktop shortcut to a website using Google Chrome and Safari.
How to Create a Desktop Shortcut to a Website Using Chrome
To create a desktop shortcut to a website using Google Chrome, go to a website and click the three-dot icon in the top-right corner of your browser window. Then go to More tools > Create shortcut. Finally, name your shortcut and click Create.
- Open the Chrome web browser. You can do this on a Mac or Windows 10 computer.
- Then go to the website you want to create a desktop shortcut for. This can be any website you want. However, if you choose a website that requires you to sign in, the shortcut will only take you to the login page once you have been signed out.
- Next, click the three-dot icon in the top-right corner of the window.
- Then hover your mouse over More tools and click Create shortcut.

- Next, enter a name for your shortcut and click Create. You can also check the Open as window box to have the website open in its own browser window. If you don’t check this box, your websites will open in a new tab of your existing browser window. This might cause problems if your browser is set to open with lots of tabs.

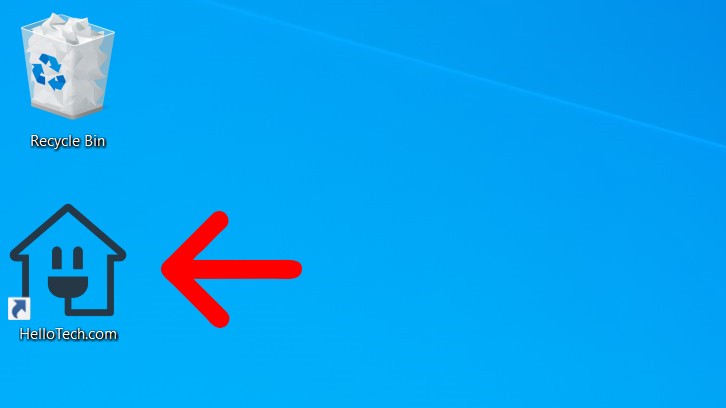
- Finally, you will see your shortcut on the desktop. With this method, you will create a desktop shortcut that has the icon of the website. Double-clicking this shortcut icon will open the website in the Chrome browser.
Note: If you are using a Mac, you will see a Finder window pop up after you click Create. All you have to do is drag the shortcut from that Chrome Apps folder to your desktop.
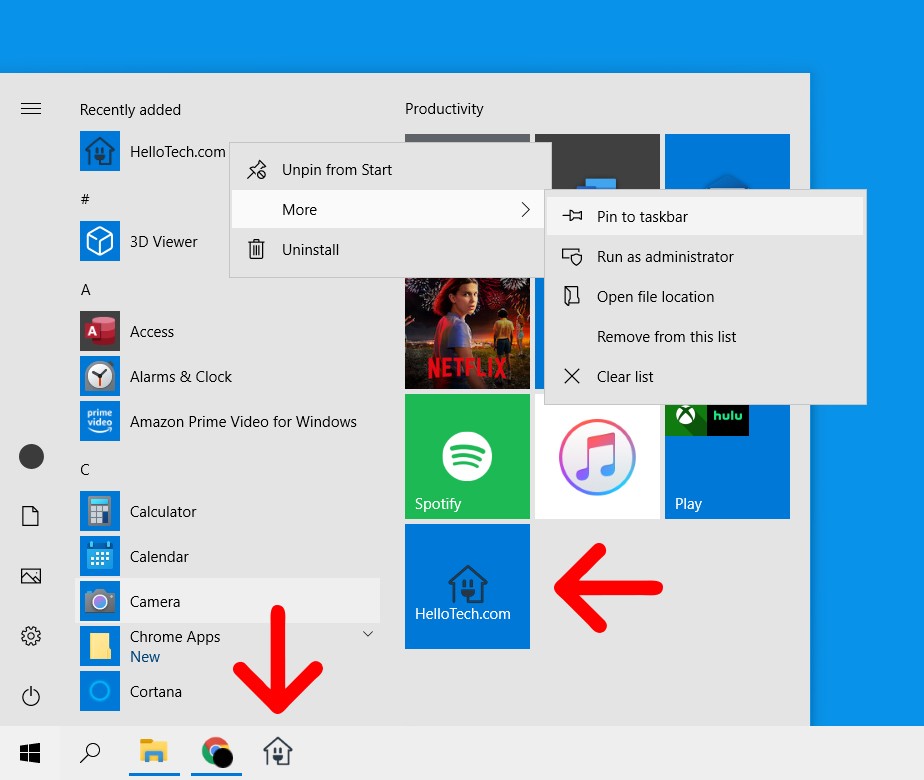
Once you have created a desktop shortcut on a Windows 10 computer, you will see it in under your Recently Added apps and in the Chrome Apps folder in your Start menu. You can then right-click the icon to add it to your Taskbar or your Start menu.
Once you create the shortcut on a Mac, you will see it in your Launchpad. You can also drag the desktop shortcut onto your Dock to access it faster.

Note: Your website shortcut will only open in the browser that you used to create it. If you want to know how to change your default browser on a Windows 10 or Mac computer, check out our step-by-step guide here
If you’re on a Mac, you can also create a desktop shortcut for a website using the Safari web browser. However, this method will be a bit more complicated if you want a nice-looking shortcut name and icon.

How to Create a Desktop Shortcut to a Website Using Safari
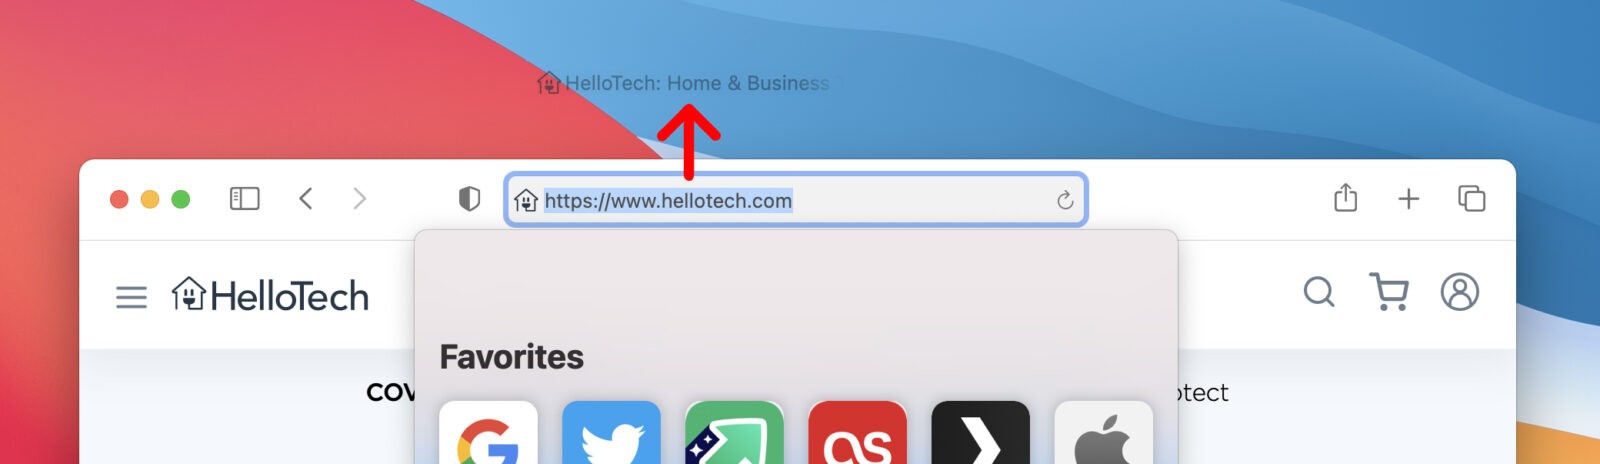
To create a desktop shortcut for a website using Safari, open a browser window and navigate to a website. Then select the URL in the address bar and drag it to your desktop. If you want a clean-looking shortcut, you’ll have to change the name and icon yourself.
- Open the Safari web browser. You want to resize your browser so you can see your desktop.
- Then go to the website you want to create a desktop shortcut for.
- Next, select the URL in the address bar.
- Then drag the URL to your desktop to create the shortcut. You can also drag the icon that is to the left of the URL.
Using this method will give you a shortcut with a long name and a generic icon. If you want to change the name and icon,click on your new shortcut and hit the Command + I keys on your keyboard. (You can also right-click the shortcut and select Get Info.) Then click the arrow next to Name & Extension and enter a new name in the text box.
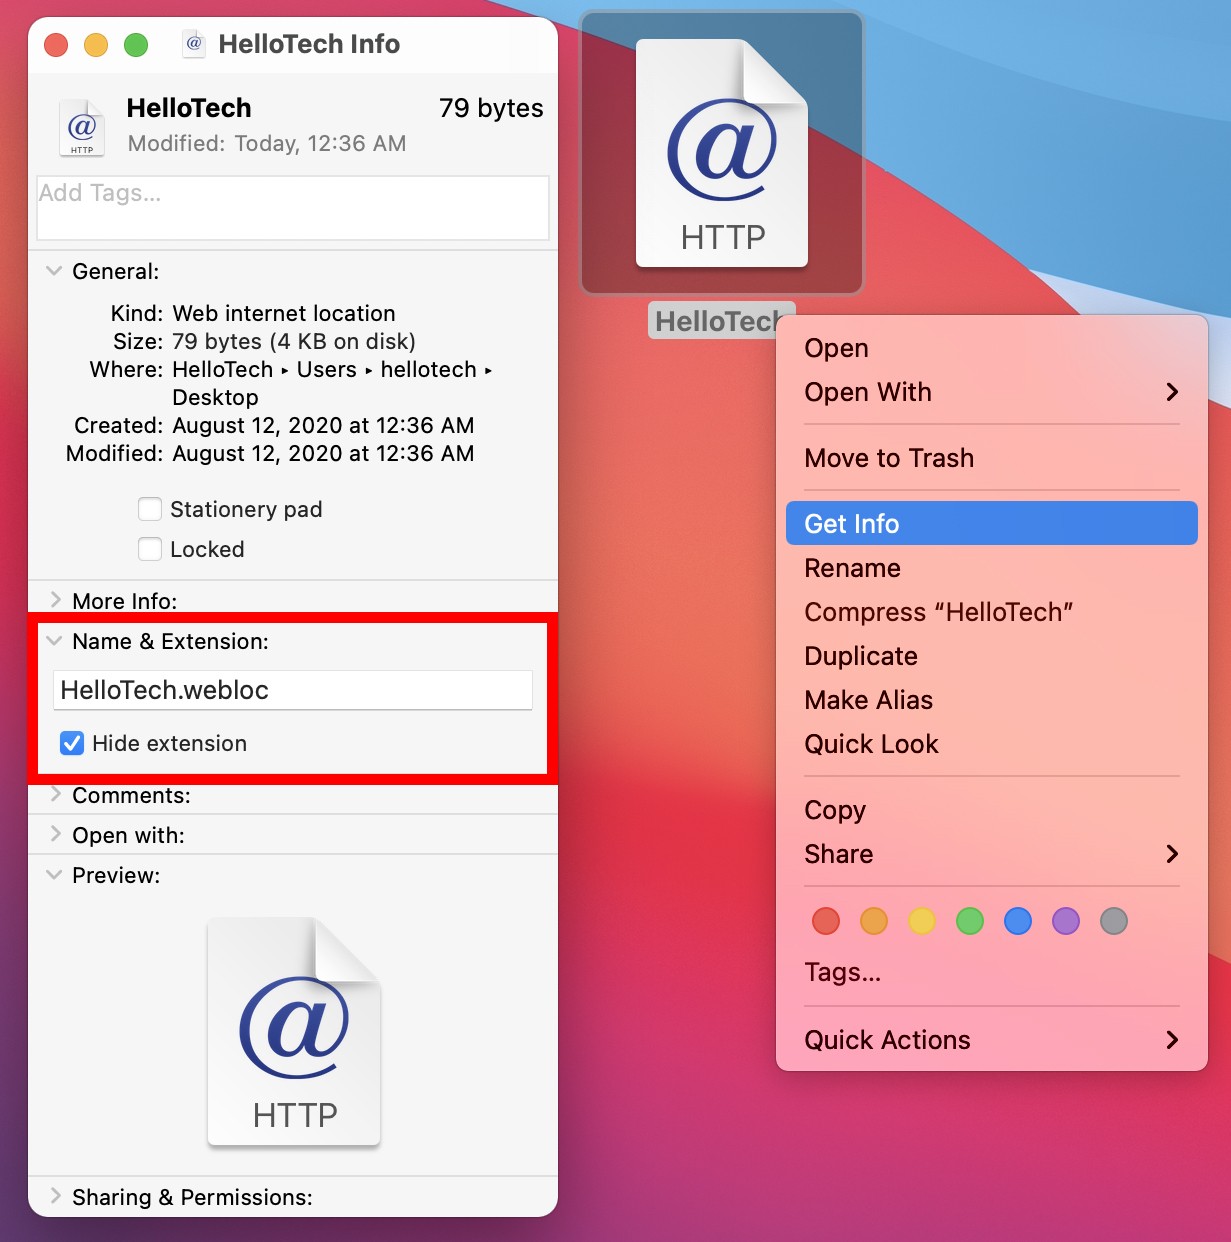
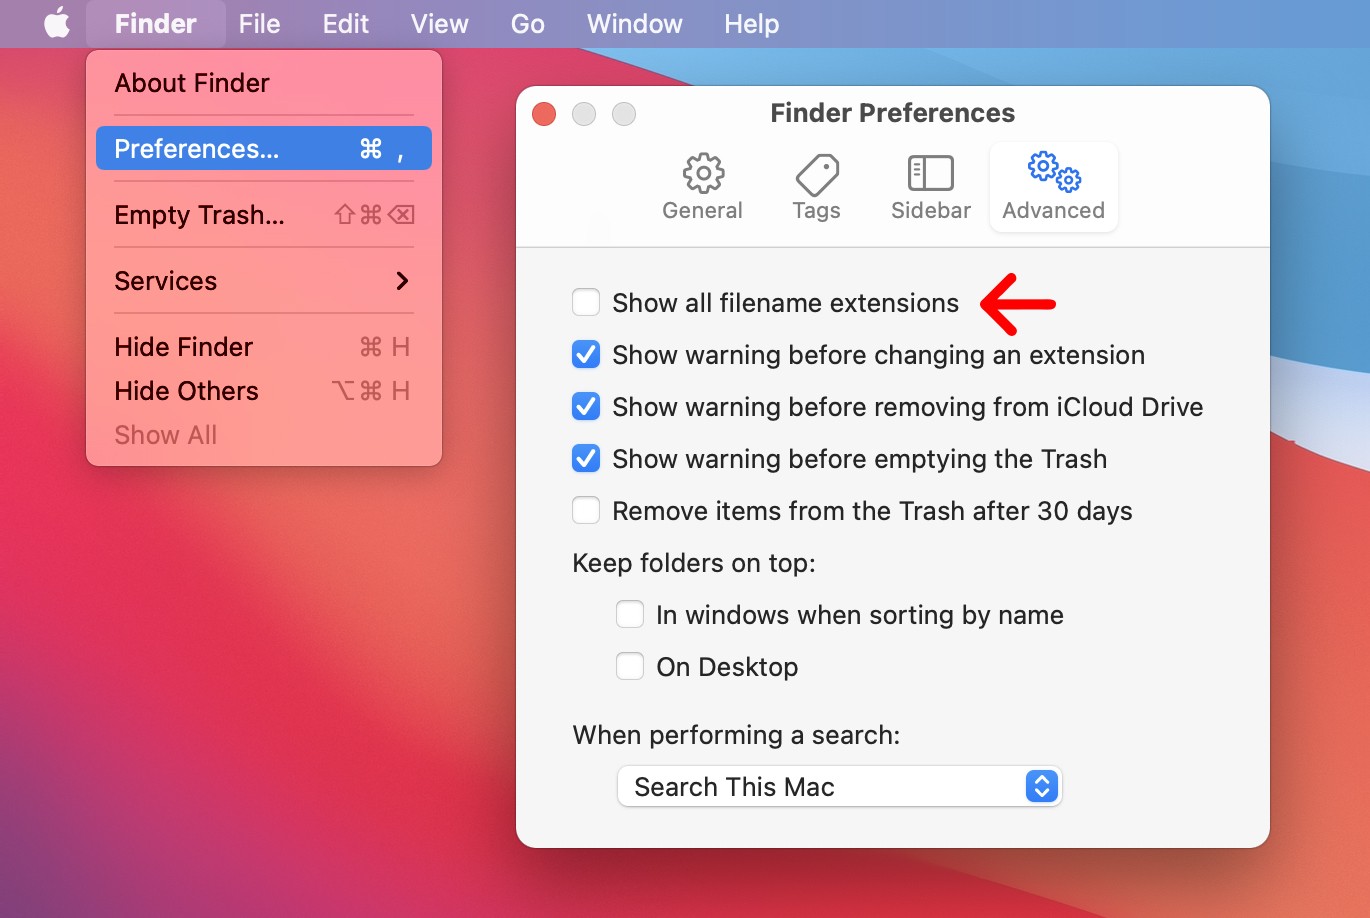
Note: You will have to keep the “.webloc” extension in order for the shortcut to work. If you don’t want to see the extension, left-click the desktop and hit the Command + Coma keys on your keyboard at the same time. (You can also open Finder and click Finder > Preferences from the Apple Menu Bar.) Then select the Advanced tab in the pop-up window and un-check the box next to Show all filename extensions.
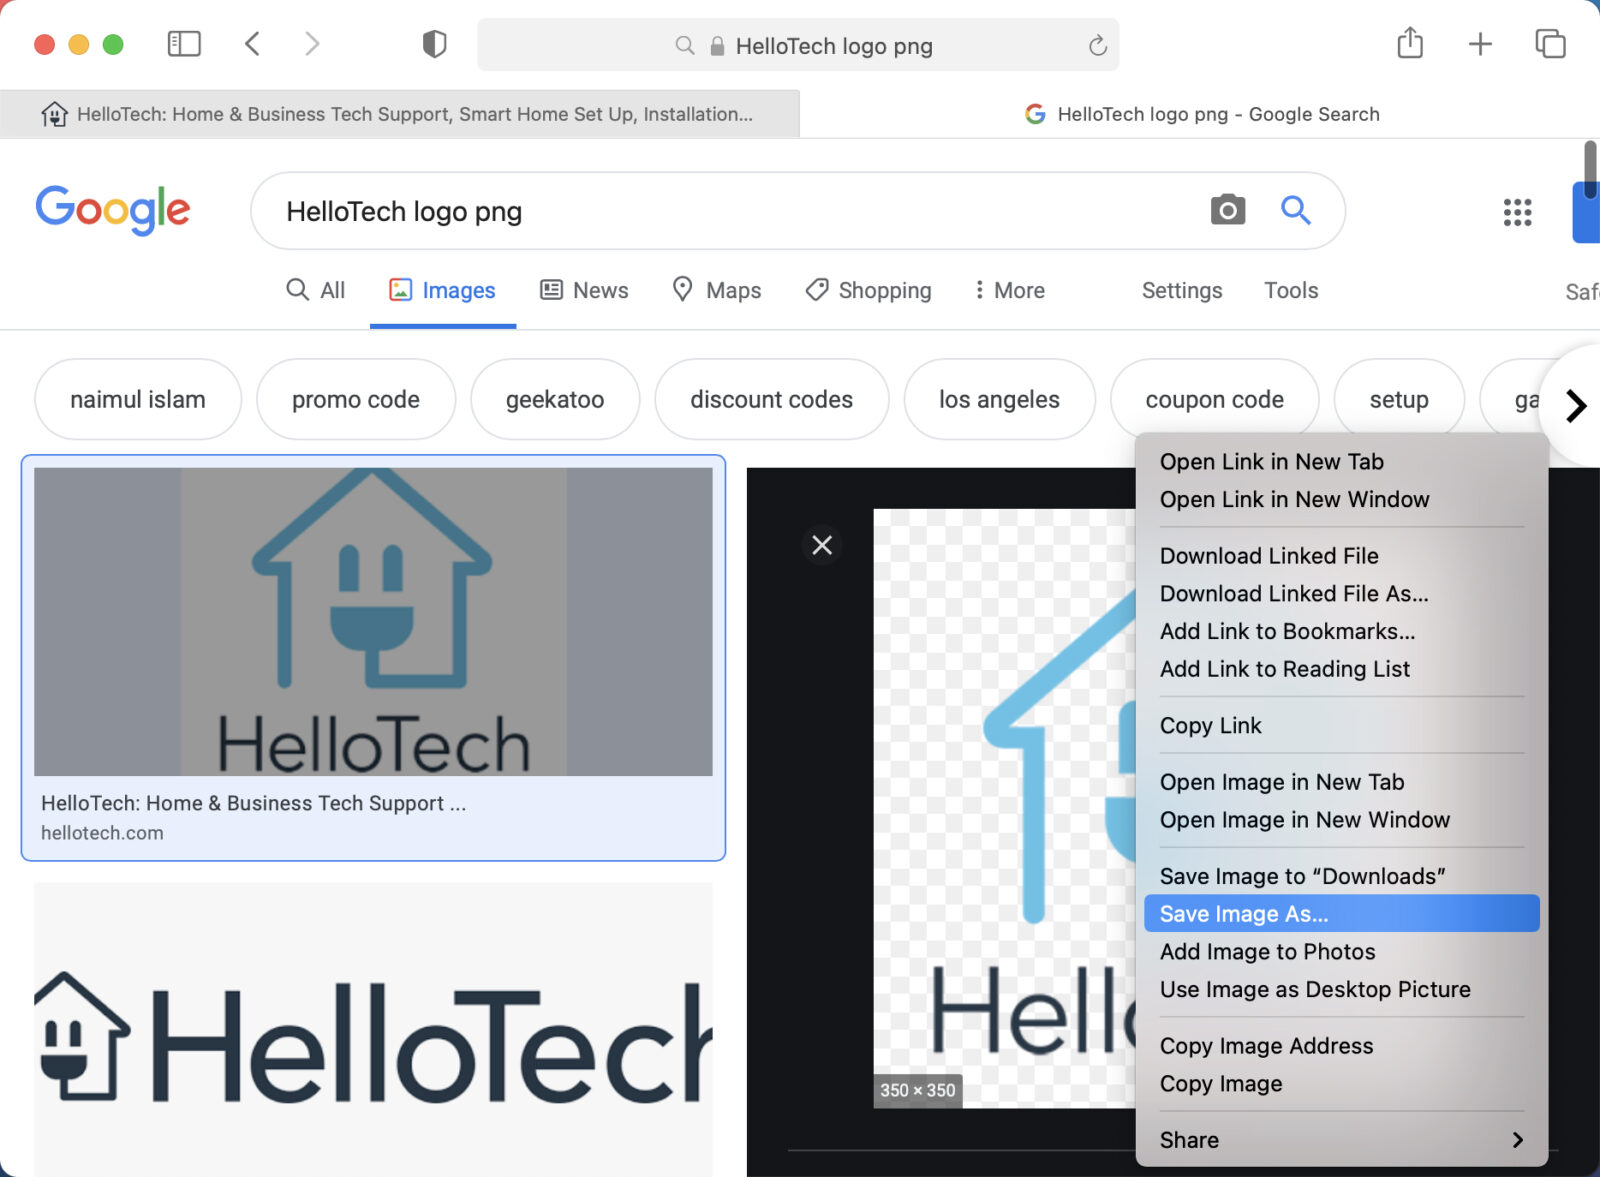
Then you can use an image online to replace the shortcut icon. Simply search for the logo of the site you are creating a shortcut for. If you want it to look clean, it is best to use a PNG file, so be sure to include that in your search. Then right-click the image you want and select Save Image As.
Then open the saved image using the Preview app and select the entire image by left-clicking and dragging a box around the image. (You can also hit the Command + A keys on your keyboard.) Next, copy the image by hitting the Command + C keys on your keyboard. Then click the icon at the top of the “get info” window you opened earlier and hit the Command + V keys to paste the image.
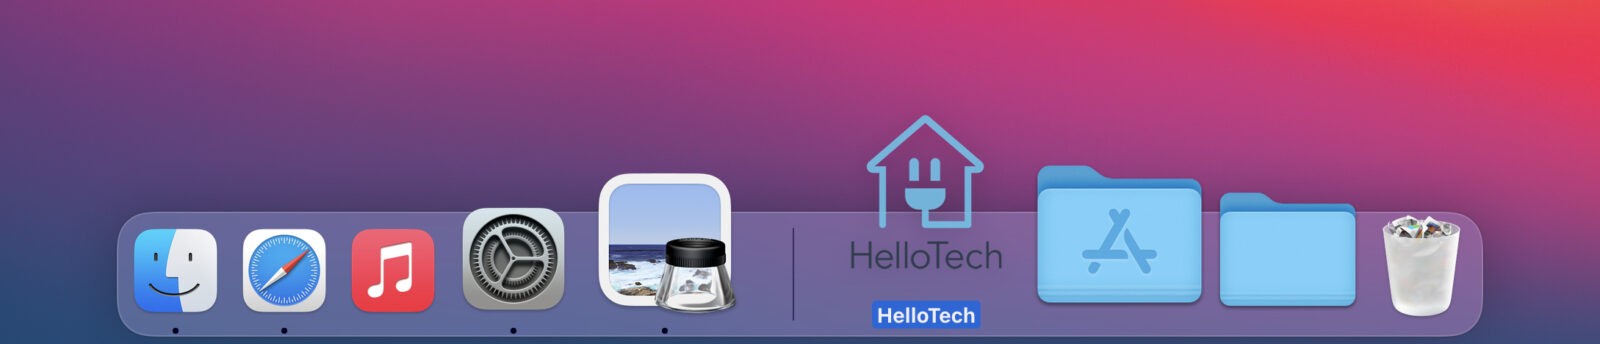
Finally, you can drag your icon to the Dock, but only on the side of the divider line that separates your apps from your folders and the Recycle Bin.
If you want to know how to change the default search engine of your browser, check out our step-by-step guide here.
Conclusion
Let us know your thoughts in the comment section below.
Check out other publications to gain access to more digital resources if you are just starting out with Flux Resource.
Also contact us today to optimize your business(s)/Brand(s) for Search Engines